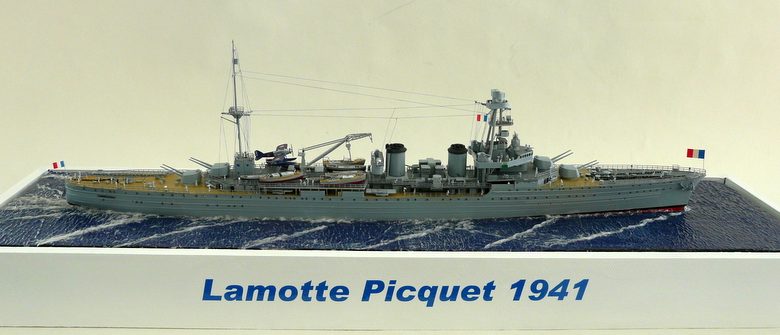
CROISEUR LAMOTTE PIQUET 1941
Tout commence par une étrange histoire. Cela remonte à quelques bonnes paires d’années. Je reçois un coup de fil (celui qui dit : « ça fait mal un coup ! » va aller au coin !). Un Monsieur que je ne connais ni d’Eve ni d’Adam me dit : « Mr PERSONNIC, j’ai une maquette à vous donner ». Un maquettiste ne refuse jamais un don de maquette quel qu’il soit. Je lui dis OK. Il me dit qu’il réside sur Brest. Je lui propose de nous donner rendez-vous lors d’une prochaine visite Brestoise. Il me demande où j’habite. Je lui réponds Crozon. Il me dit alors : « j’arrive ». Une heure plus tard, on se retrouve au local de l’association et il me remet la boîte de la marque PACIFIC CROSS ROADS, du croiseur LAMOTTE PIQUET au 350 ème et ce monsieur disparaît aussitôt et je n’en saurai pas plus. Jamais entendu parler de cette marque.
It all starts with a strange story. It goes back a few good pairs of years. I get a phone call (the one who says « it hurts a bit! » goes to the corner!). A gentleman I don’t know of Eve or Adam said to me: «Mr PERSONNIC, I have a model to give you». A model designer never refuses a model donation of any kind. I tell him OK. He tells me that he lives on Brest. I suggest that he give us an appointment on another visit to Brest. He asks me where I live. I say Crozon. He then tells me: “I’m coming.” An hour later, we meet at the local of the association and he gives me the box of the brand PACIFIC CROSS ROADS, of the cruiser LAMOTTE PIQUET at 350 and this gentleman disappears immediately and I will not know more. Never heard of this brand.
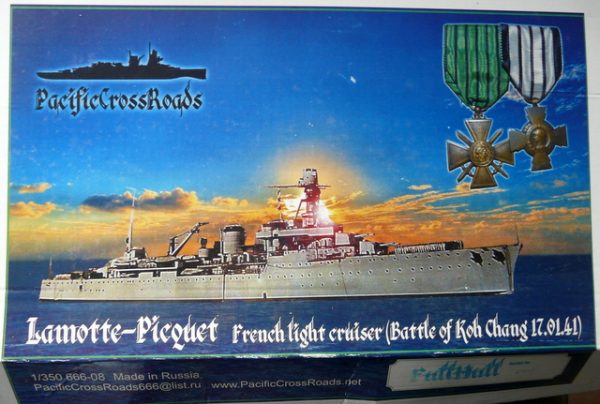
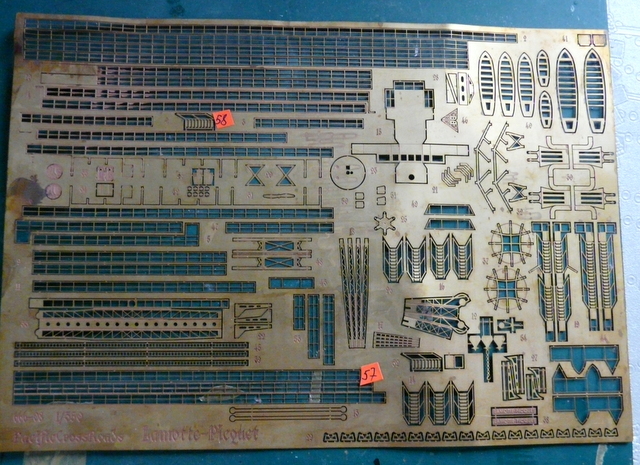
J’ouvre la boîte, c’est de la fabrication Russe et multi-matériaux, résine, plastique, photodec, fil laiton. Pas trop ma tasse de thé, ne montant que du plastique. Mais, c’est un bateau Français, carrément jamais vu dans les expos.
I open the box, it is Russian manufacture and multi-materials, resin, plastic, photodec, brass thread. Not too much my cup of tea, going up only plastic. But, it is a French boat, absolutely never seen in the exhibitions.


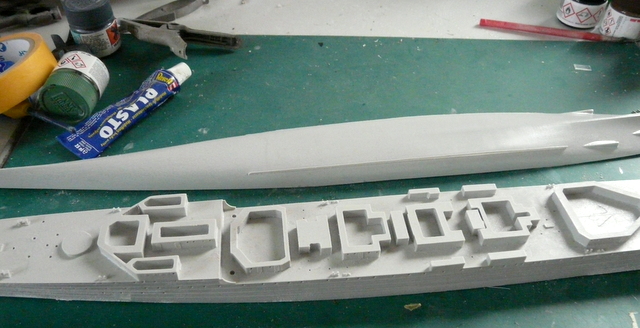
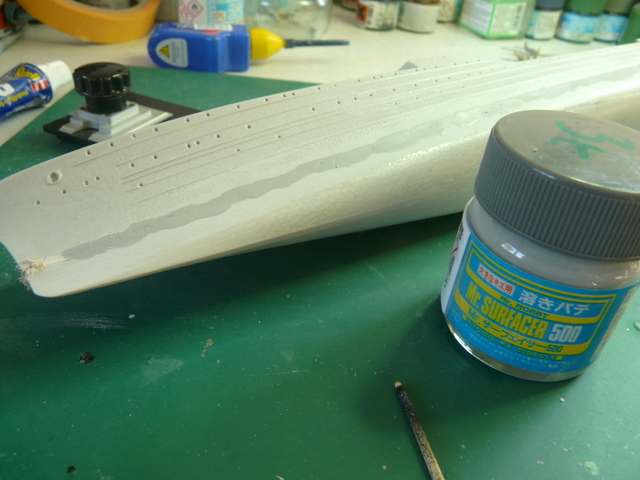
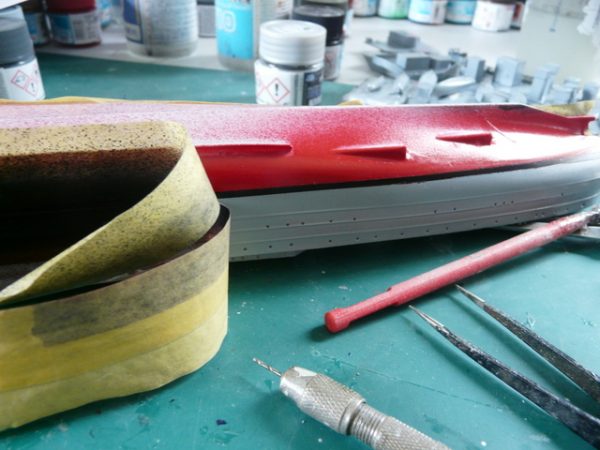
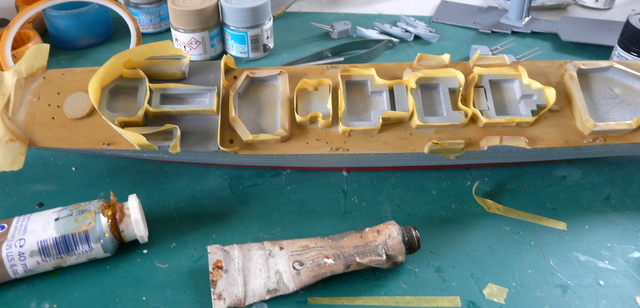
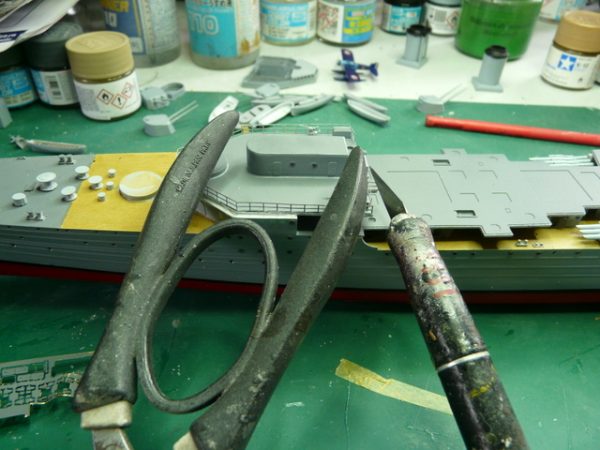
La coque est pleine, en résine et en deux parties. Le dessous et le dessus : il y a un bon poids de résine. On commence par le plus difficile, enlever les carottes de moulage de ces deux grosses pièces, 5 mm de bonne résine bien épaisse. Je commence au cutter, pas terrible, puis au disque de tronçonnage sur mini perceuse, pas plus heureux. Et je finis à la ponceuse électrique de bricolage, là ça dépote.
The shell is full, in resin and in two parts. The bottom and top: there is a good weight of resin. We start with the hardest part, removing the moulding cores from these two large pieces, 5 mm of good, thick resin. I start with the cutter, not terrible, then the cutting disc on mini drill, not happier. And I end up with the DIY electric sander, now it’s depressing.
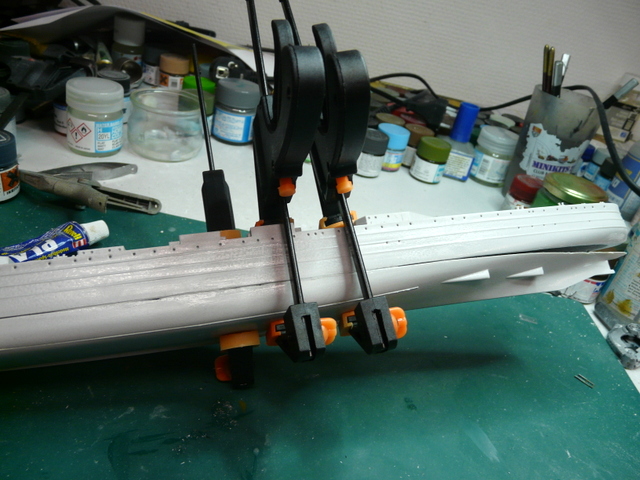
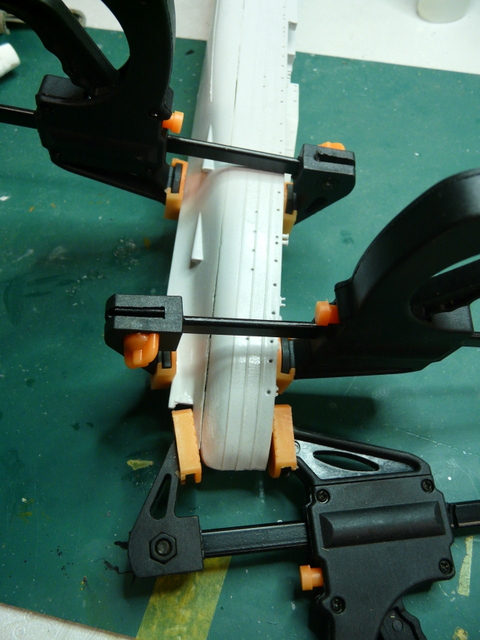
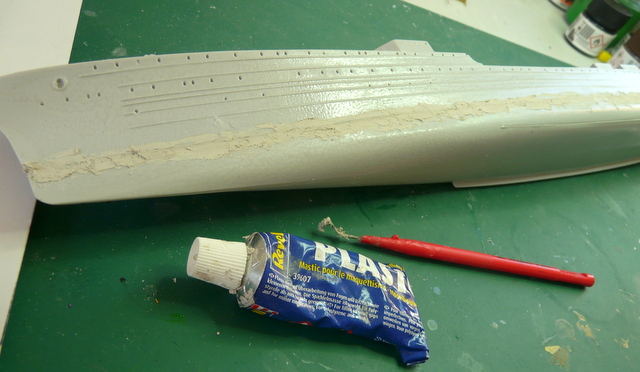
Le collage des deux demi coques se fera en trois temps, à la cyano et à l’aide de presse. Ça va pas mal. Puis masticage au mastic plastique PLASTO REVELL et finition au SURFACER GUNZE et épreuve laborieuse de ponçage mais, en fin de compte, ça le fait très bien.
The bonding of the two half hulls will be done in three stages, using cyano and press. Things are going well. Then PLASTO REVELL plastic sealant and SURFACE GUNZE finish and laborious sanding test but, in the end, it does very well.
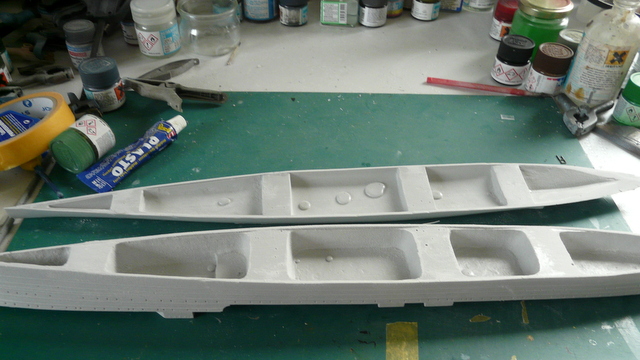


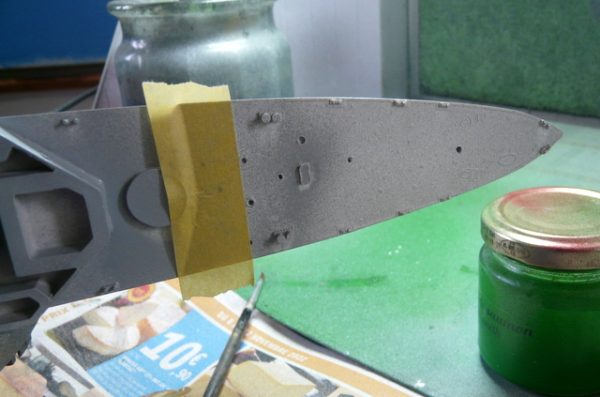
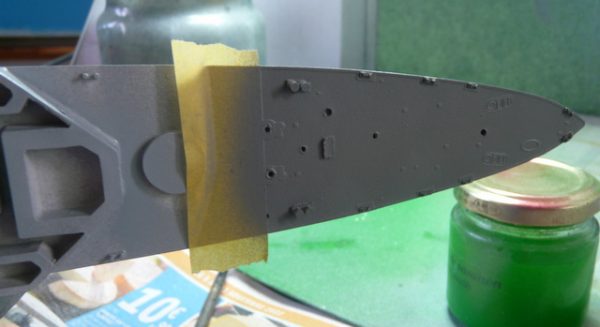
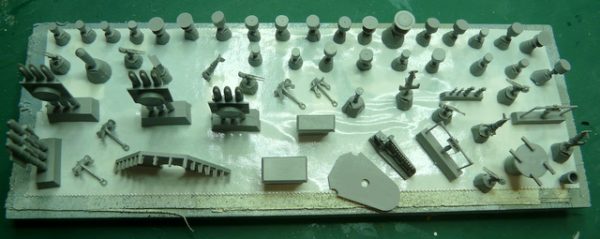
Apprêtage en blanc mat, la coque est nickel, donc, plus d’a priori de départ, pour un travail pas si difficile que cela. J’en profite pour apprêter plusieurs pièces, fixées sur des petites planchettes avec du double face. Les pièces en résine sont d’une qualité incroyable, rien à enlever. Elles sont parfaites.
Primed in matt white, the shell is nickel, so, more a priori of departure, for a job not so difficult than that. I take the opportunity to prepare several pieces, fixed on small laths with double face. The resin parts are of incredible quality, nothing to take away. They are perfect.
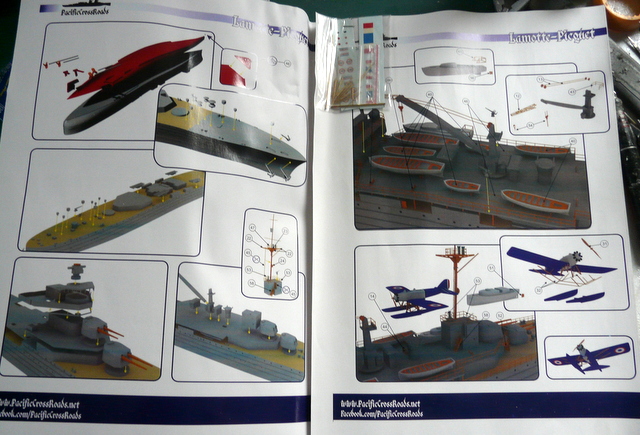
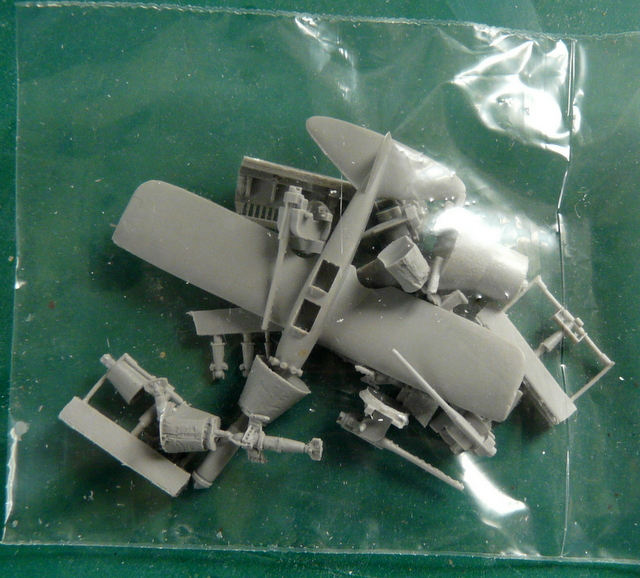
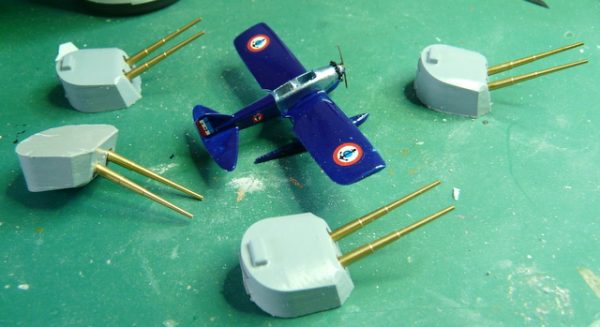
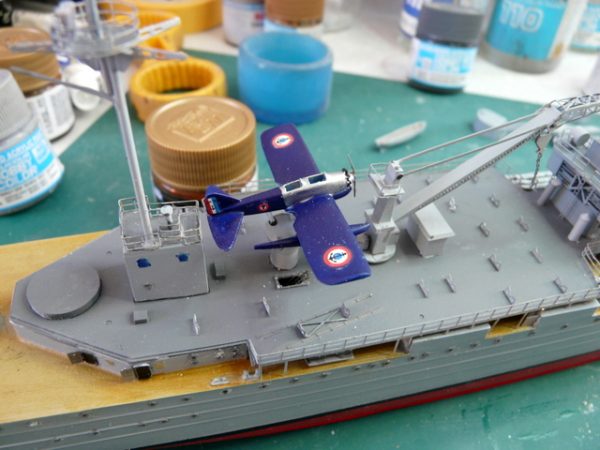
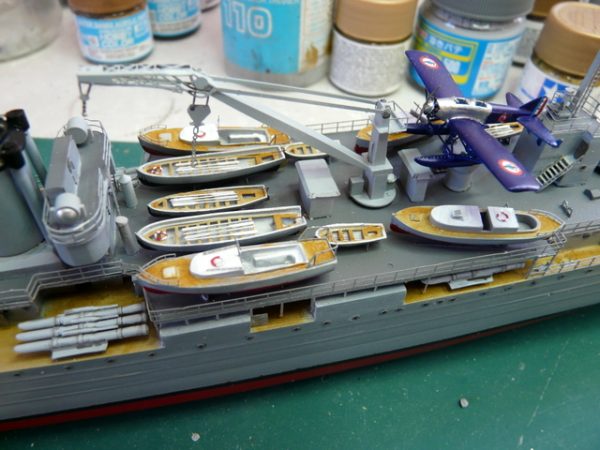
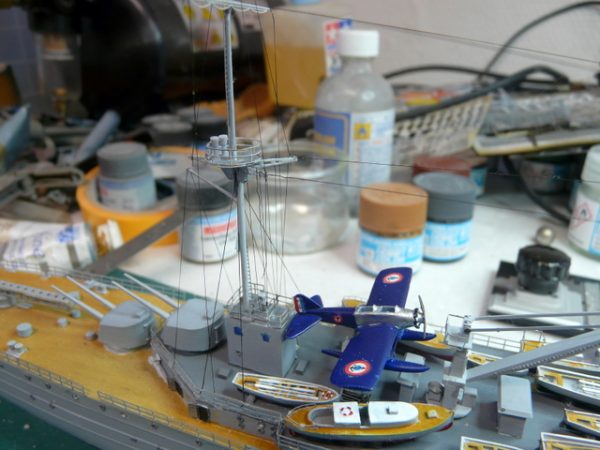
Montage du petit avion, une maquette à lui tout seul. Puis mise en peinture de l’avion en bleu brillant et métal pour son museau. Pose des décalques aéronavales qui malgré leur grand âge se posent sans souci et couche de vernis mat en finale. Pose des affûts sur les canons, pas de souci, ceux-ci, en laiton tourné et percés au bout, sont magnifiques ; le tout est collé à la cyano.
Assembly of the small plane, a model of itself. Then painting of the plane in brilliant blue and metal for its snout. Installation of aeronaval decals that despite their great age pose without worry and coat of matt varnish in final. Place the blinds on the cannons, no worries, these, turned brass and drilled at the end, are magnificent; everything is glued to the cyano.
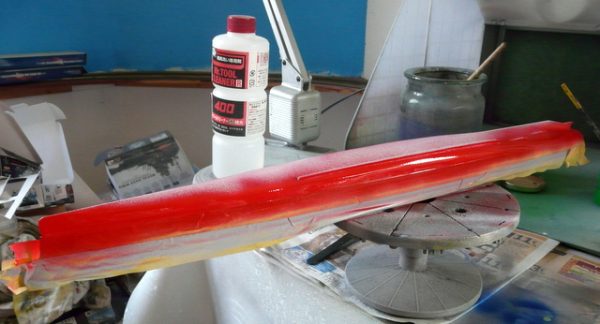
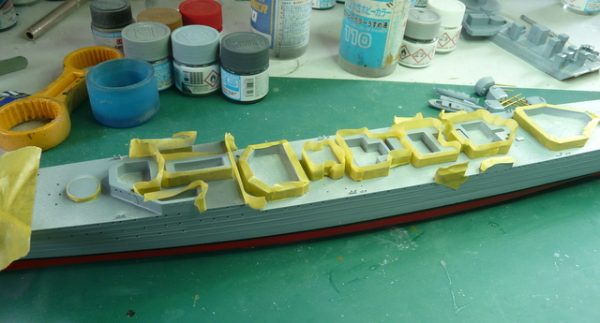
Mise en peinture du gris de la coque, malgré le blanc mat d’apprêt, deux couches seront nécessaires ; j’ai délimité le bas pour ne faire que l’essentiel. Puis le rouge de la sous marine après masquage. Pour délimiter la bande noire du col à mazout, je laisse l’adhésif sur le gris. Puis je rajoute en dessous, une bande de scotch de 3 mm. Puis sous cette bande, je masque le rouge. Je n’ai plus qu’à enlever la bande de 3 mm et à peindre en noir. (Je ne sais pas si tout le monde a suivi).
Painting of the grey of the hull, despite the matt white of primer, two coats will be necessary; I delimited the bottom to do only the essential. Then the red of the submarine after masking. To delineate the black band of the oil neck, I leave the adhesive on the grey. Then I add a 3 mm tape below. Then under this tape, I mask the red. All I have to do is remove the 3 mm strip and paint black. (I don’t know if everyone followed).
Peinture du pont avant en gris océan, trop foncé à mon goût, j’ai repris avec un gris plus clair. Puis s’en suit un long travail d’emballage comme un carrossier.
Front deck paint in ocean grey, too dark for my taste, I resumed with a lighter grey. Then follows a long work of packing like a bodybuilder.
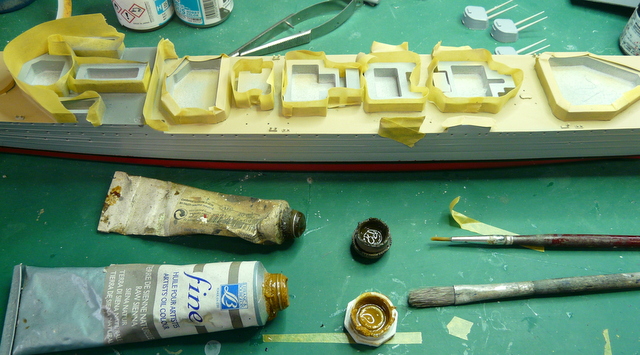
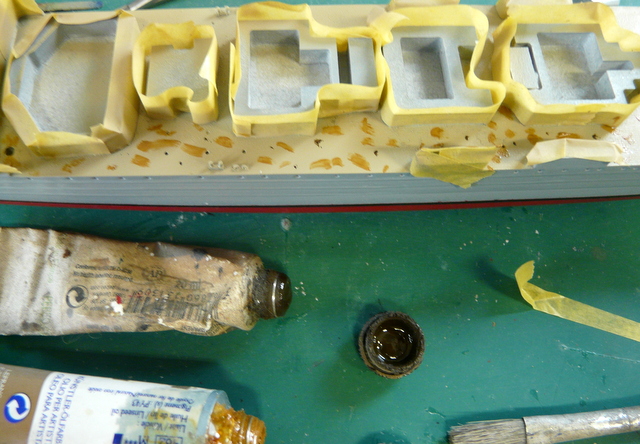
Une fois emballé, je peins le pont uniformément à l’aéro avec une couleur GUNZE 85 (couleur de voile). Le lendemain (je laisse toujours un jour pour sécher, il faut bien se reposer aussi ) je sors mes 2 tubes de peinture à l’huile indispensable à notre activité, terre de sienne et ombre naturelle. Vous achetez ces deux tubes, à 20 ans, ils devraient faire toute votre longue carrière de maquettiste. Avec un pinceau, je tache de divers points le pont en terre de sienne puis en taches plus petite d’ombre naturelle. A l’aide d’une brosse, je tire la peinture dans le sens du plancher bien évidemment. L’avantage, c’est que l’on peut en rajouter à sa guise. Le petit inconvénient, c’est que cela met trois jours à sécher, mais on a le temps et la vie devant soi. Petit conseil, cette peinture se dilue à l’essence de pétrole (petits flacons que l’on trouve au rayon « loisirs créatifs ») et non avec du white spirit qui l’a rend brillante.
Once packed, I paint the deck evenly with aero with a GUNZE 85 color (sail color). The next day (I always leave a day to dry, it is necessary to rest also ) I take out my 2 tubes of oil paint essential to our activity, earth of his and natural shade. You buy these two tubes, at 20, they should make your entire long career as a model designer. With a brush, I stain from various points the bridge in his earth then in smaller spots of natural shade. With the help of a brush, I draw the paint in the direction of the floor of course. The advantage is that we can add as much as we like. The small drawback is that it takes three days to dry, but you have time and life ahead of you. As a small tip, this paint is diluted with petroleum essence (small bottles found in the “creative hobbies” section) and not with the white spirit that made it brilliant.
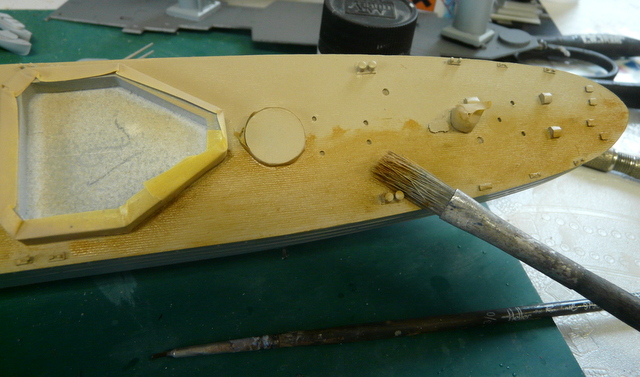

Un coup de peinture sur les petites pièces en résine posées sur du double face sur une plaquette de bois. A paint job on the small resin pieces placed on the double side on a wooden plate.
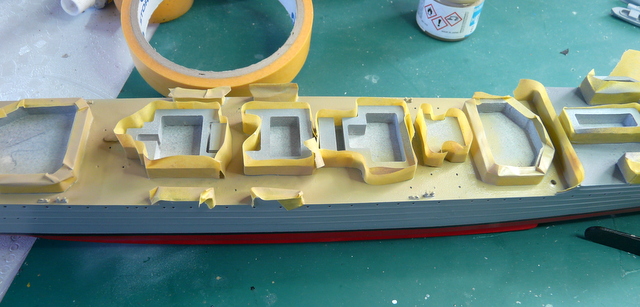
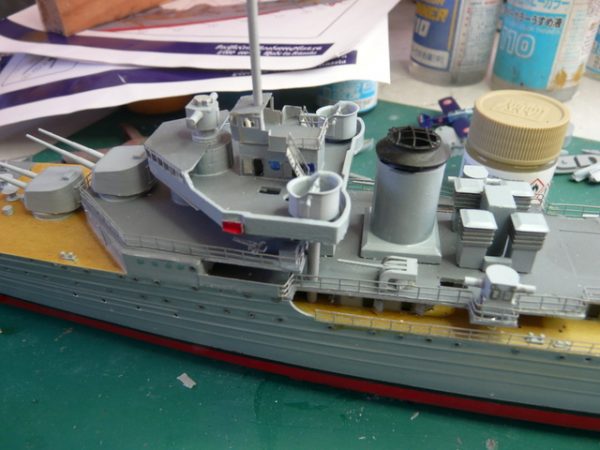
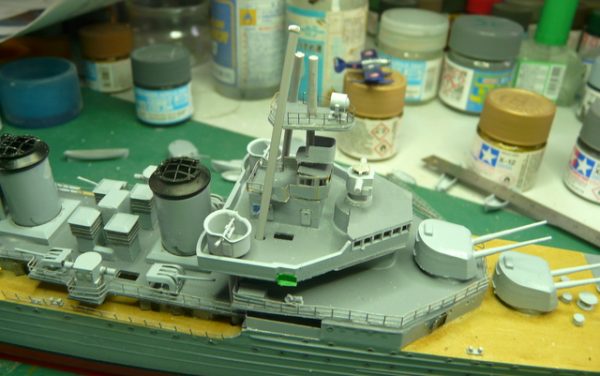
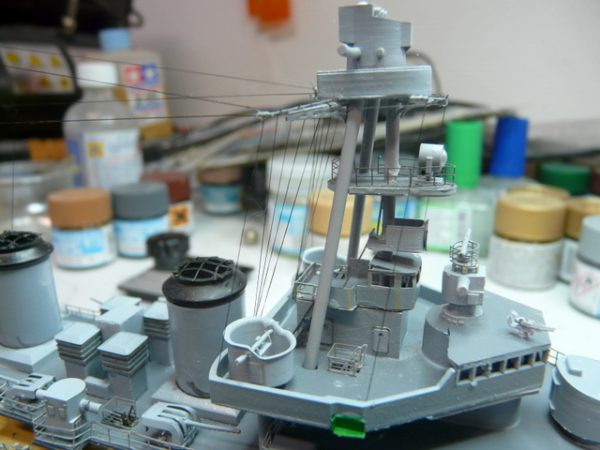
Les hublots n’étant pas terrible, j’ai posé plus de 100 hublots EDUARD au 350 à la cyano. Long et laborieux sur trois jours, sous peine de « burn out » ! The windows were not great, so I installed more than 100 EDUARD windows at 350 with cyano. Long and laborious over three days, under penalty of « burn out »!
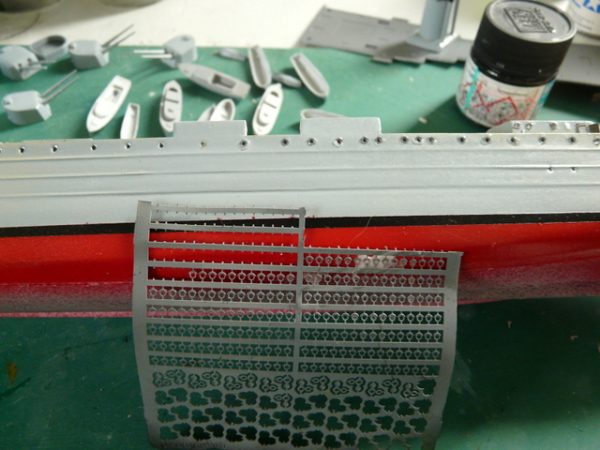
La planche de photodec est très dure (faite sûrement dans l’acier des sous-marins nucléaires Russes déclassés). La découpe des pièces est difficile, même les rambardes se collent entre elles. Pas de pli prédisposé à l’endroit du pliage, il faut tout mesurer au millimètre près. Le tout est collé à la cyano, portion par portion. The photodec sheet is very hard (probably made in the steel of decommissioned Russian nuclear submarines). Cutting parts is difficult, even railings stick together. No folds predisposed at the bend, everything must be measured to the millimeter. Everything is glued to the cyano, portion by portion.
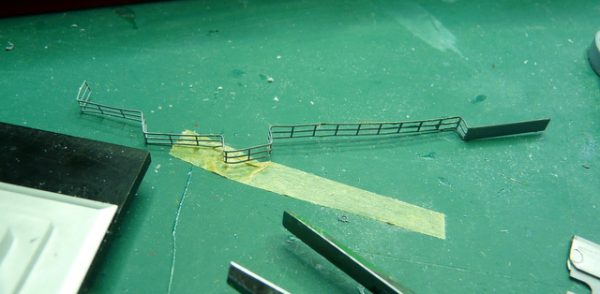
Il n’y a pas de téton d’assemblage ou de repère et on se demande où vont les pièces. Comme le pont passerelle avant. Après avoir vu et revu le plan, j’ai vu qu’il fallait poser deux poteaux qui calent parfaitement l’emplacement du pont. Deux jolis feux en photodec agrémentent ce pont. There is no assembly nipple or marker and we wonder where the parts go. Like the front bridge. After seeing and reviewing the plan, I saw that it was necessary to install two posts that perfectly fit the location of the bridge. Two nice lights in photodec decorate this bridge.
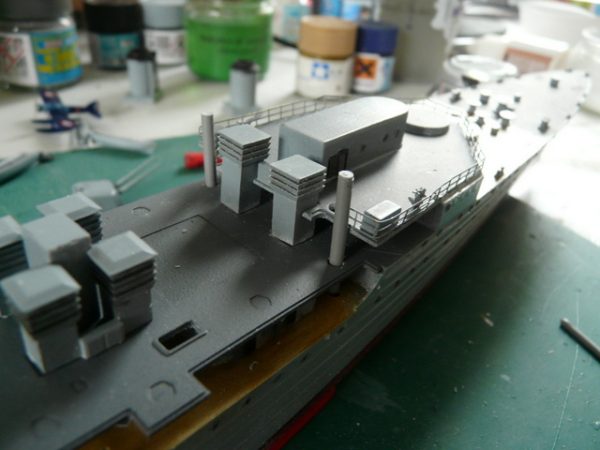
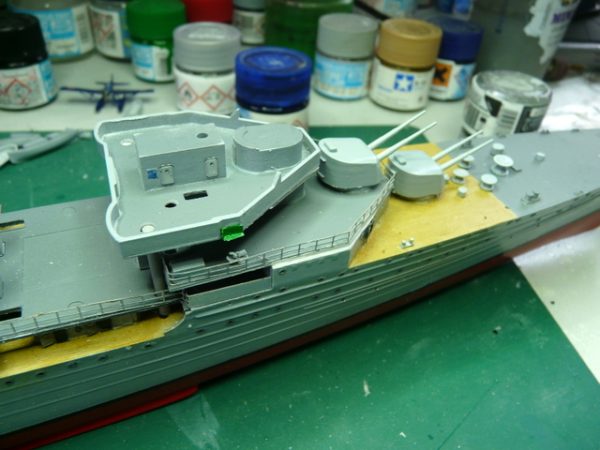
Puis vient la pose des cheminées avec une grille en photodec à poser dessus ; et la pose des pièces d’artillerie. J’ai tenté d’utiliser un petit canon en laiton, un échec, beaucoup trop petit et trop fin, j’en suis resté à la pièce d’origine. Then comes the laying of the chimneys with a photodec grid to put on; and the laying of artillery pieces. I tried to use a small brass barrel, a failure, much too small and too thin, I stayed at the original part.
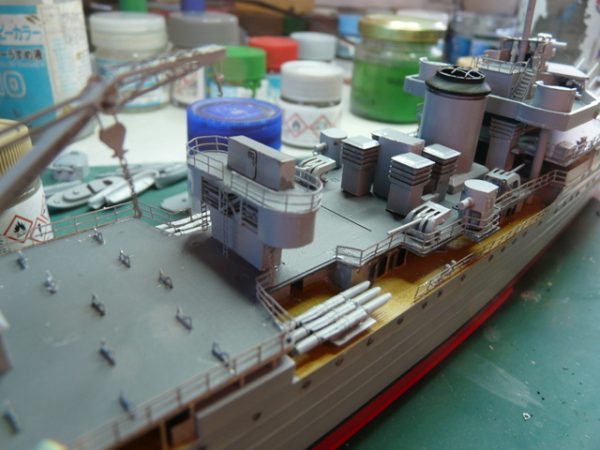
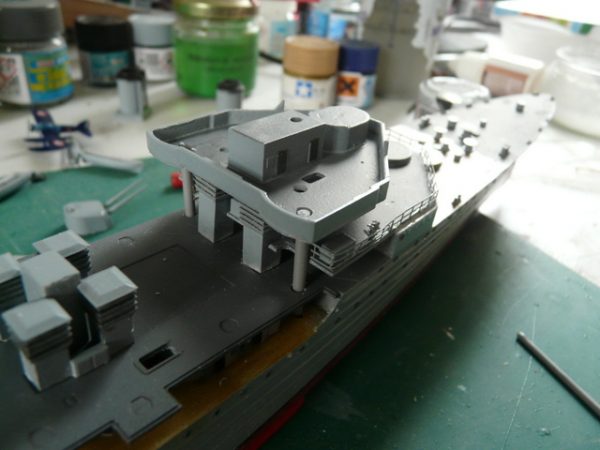
L’installation du mat tripode avant n’est pas une mince affaire. Il faut retailler les orifices où il passe. Je rappelle que toutes ces pièces sont en résine et il faut les retailler en longueur pour qu’elles soient ajustées toutes à la même hauteur. Pour la pose de la passerelle sur le tout, j’ai bricolé un petit échafaudage pour caler la pièce pendant son séchage. Installing the front tripod mast is not an easy task. You have to cut the holes where it passes. I remind you that all these pieces are made of resin and you have to cut them in length so that they are all adjusted to the same height. For the installation of the bridge on the whole, I rigged a small scaffolding to block the room during its drying.
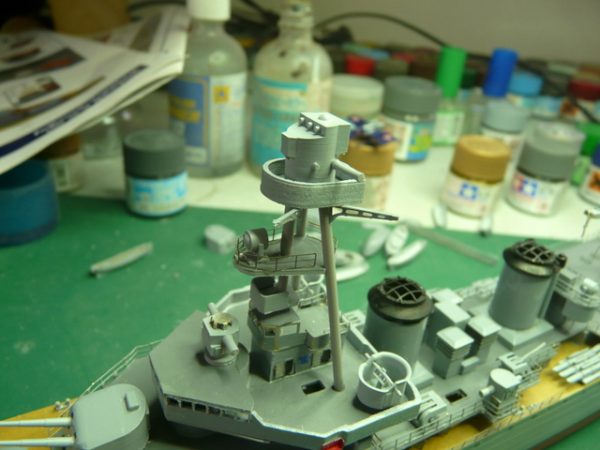
Pose du mat arrière, je n’ai pas compté le nombre de fois que la vergue s’est décollée avec une fausse manipulation. J’ai refait les bers des canots avec de la photodec de ma boîte à rabiot car l’originale est impossible à plier. Pose du petit avion (très beau) qui tient à peine sur ses patins. Installation of the rear mast, I did not count the number of times that the yard came off with a false manipulation. I have redone the cradles of the canoes with photodec of my rabiot box because the original is impossible to fold. Landing of the small plane (very beautiful) which barely fits on its skates.
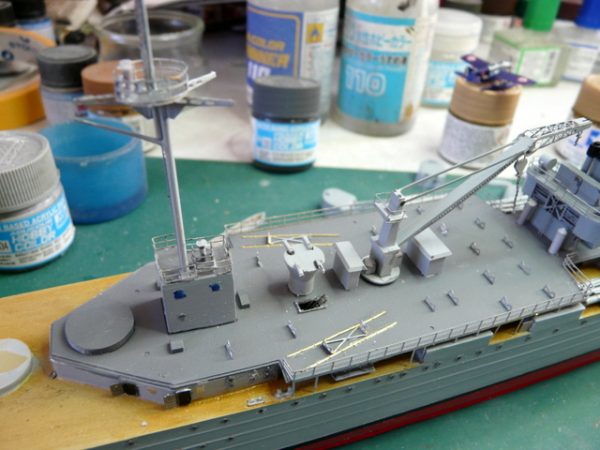
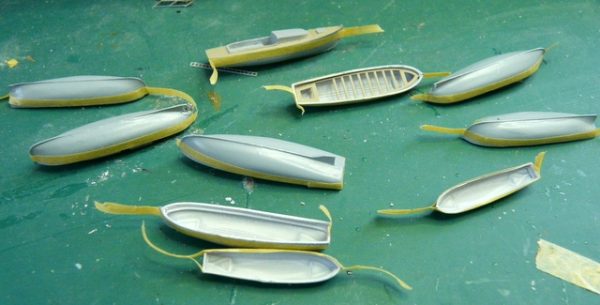
Un gros morceau arrive avec les canots. J’ai amélioré la peinture car initialement tout est proposé en gris uniforme. J’y ai rajouté des pièces en photodec de la boîte à rabiot (rambardes, rames, bouée de sauvetage…). Le tout est collé à la cyano. A big piece arrives with the canoes. I improved the paint because initially everything is offered in uniform grey. I added pieces in photodec of the rabiot box (railings, oars, lifebuoy…). Everything is glued to the cyano.
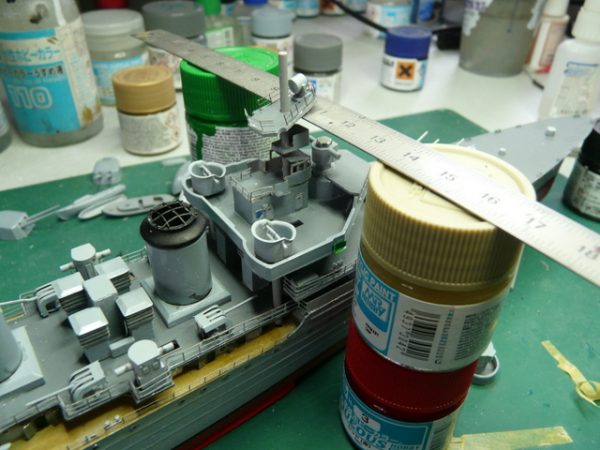
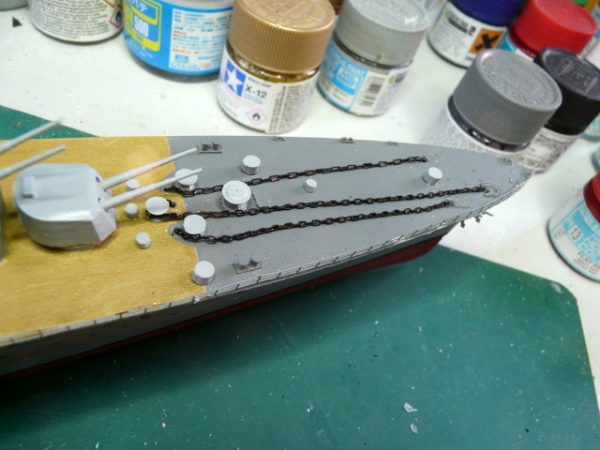
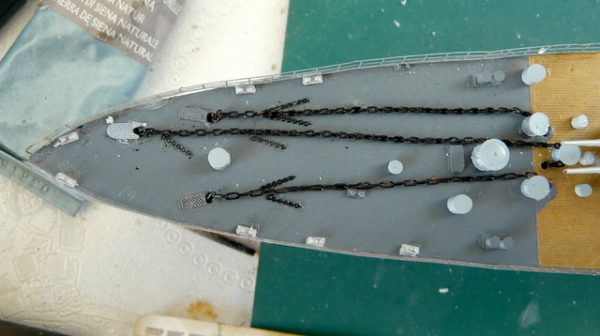
Vient enfin les lignes de mouillage, sur la plage avant et arrière, totalement oubliées par le constructeur. Grace à l’ami Michel de Camaret qui dispose d’une énorme documentation, j’ai pu trouver des photos de la plage avant. Sur le net, on ne voit que des vues d’ensemble et de loin. J’ai perçé mes puits de chaînes, collé mes chaînes peintes en noir (boîte à rabiot) et mis des grilles de protection provenant toujours de la fameuse boîte à rabiot. Un petit coup de manche et hop, la vergue du mat arrière a encore sauté !!! Pour l’arrière, j’ai improvisé car je n’ai pas trouvé de vue détaillée. Finally comes the mooring lines, on the front and rear beach, totally forgotten by the manufacturer. Thanks to the friend Michel de Camaret who has a huge documentation, I was able to find photos of the beach before. On the net, you can only see the big picture from a distance. I drilled my chain shafts, glued my chains painted black (rabiot box) and put protective grids still coming from the famous rabiot box. A little stick and then the yardarm of the rear mast jumped again!!! For the rear, I improvised because I couldn’t find a detailed view.
Le haubanage des mâts ne pose pas de problème. Toujours avec du fil lycra 70 deniers de la marque INFINI MODEL. Très facile à utiliser, un petit point de cyano, pas trop de tension et cela va tout seul en place. Le plan de peinture donne pas mal d’indication sur le haubanage.
The struts of the masts are not a problem. Always with 70 denier lycra wire from the brand INFINI MODEL. Very easy to use, a small point of cyano, not too much tension and it goes alone in place. The paint plan gives a lot of indication on the guying.
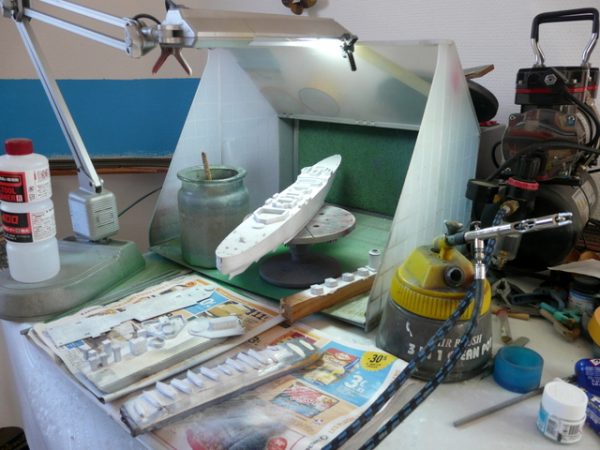
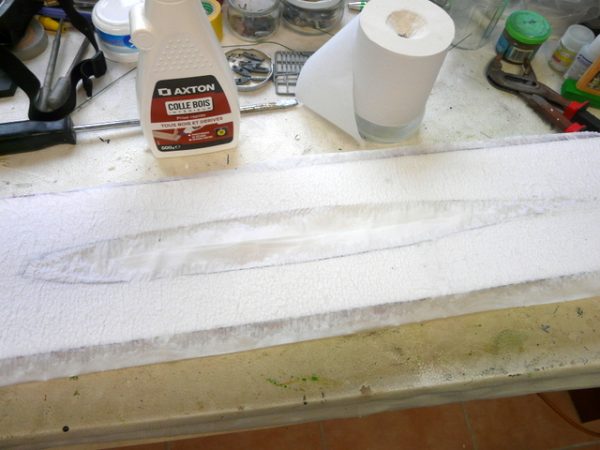
En parallèle, j’attaque le diorama. Je pensais mettre ce bateau en situation avec un autre navire, mais ce kit étant tellement rare, il brillera tout seul dans sa vitrine. Le principe, comme vous avez pu le lire dans mes précédents reportages, est toujours le même, planche de contreplaqué, deux plaques de polystyrène pour arriver à 3cm d’épaisseur et nappage au papier WC. In parallel, I attack the diorama. I was thinking of putting this boat in a situation with another ship, but this kit being so rare, it will shine all alone in its window. The principle, as you may have read in my previous reports, is always the same, plywood sheet, two sheets of polystyrene to arrive at 3cm thick and napping on WC paper.
Suite et fin, la semaine prochaine …The rest of next week…
Topo, photos et montage : Alpers