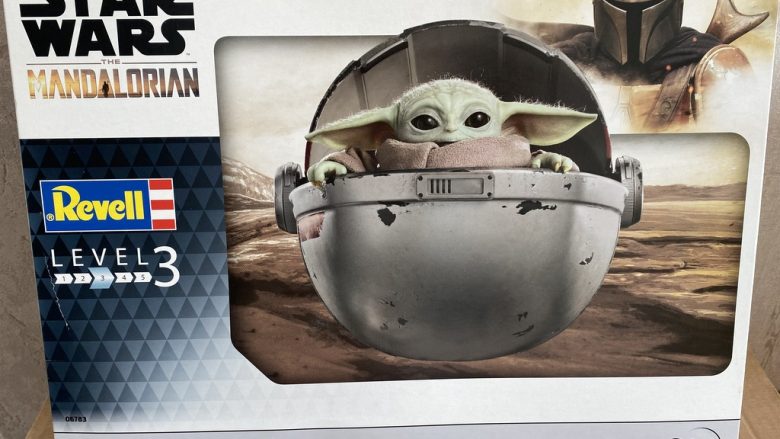
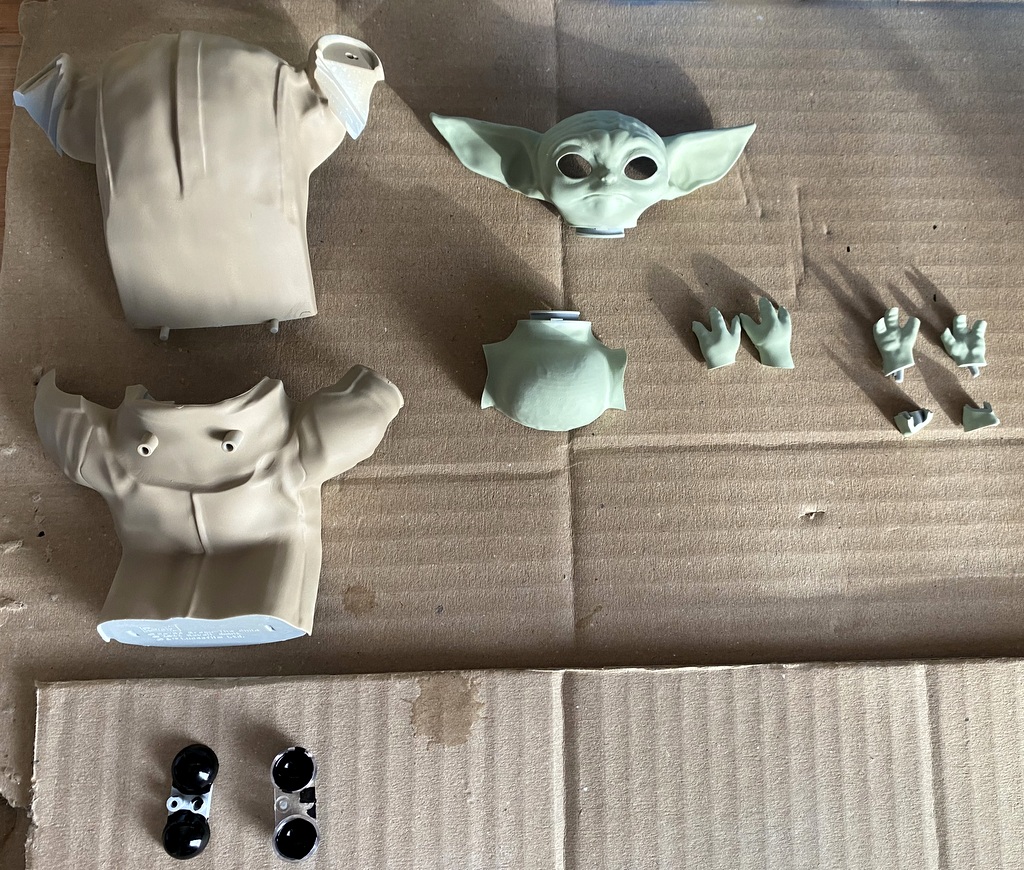
Un 2ème petit article. J’ai pensé faire celui-là, toujours comme néophyte et pour les néophytes, avec peut-être en retour des pros leurs avis sur le déroulé du travail. J’ai eu un super cadeau pour Noël !! Un personnage de Star Wars, Série le Mandalorian, le dénommé Grogu ! Bon, je ne suis pas un réel fervent de cette série, alors je ne m’étalerai pas sur l’histoire (désolé pour les accros !) mais la réalisation de cette maquette me permet un changement de registre (avion, bateau qui sont plutôt ma tasse de thé !) et ainsi poursuivre mon ré-apprentissage !
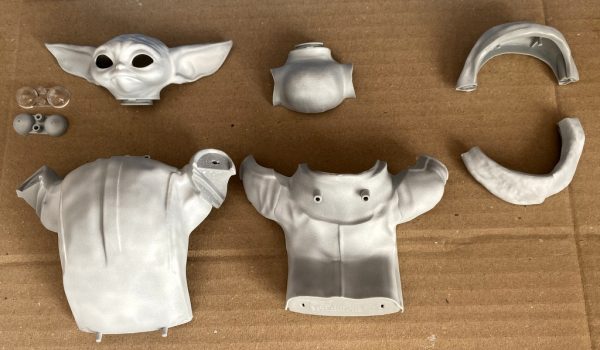
J’ai voulu, à travers cet article, montrer comment je procède et ainsi bénéficier des remarques pertinentes des pros que j’ai vraiment appréciées lors de vos retours sur mon Bréguet ! Après, je sais que rien ne vaut la pratique et les erreurs pour progresser !! J’ai donc démarré par lire la notice complètement et ainsi me permettre de juger si je devais suivre intégralement le déroulé ou bien modifier certaines actions pour me faciliter la tâche. Puis, j’ai directement apprêté en blanc toutes les pièces sur les plaques : une couche seulement.
A second little article. I thought of doing this one, still as a neophyte and for neophytes, with perhaps in return the pros their opinions on the course of work. I had a great gift for Christmas! A character from Star Wars, Mandalorian Series, called Grogu! Well, I am not a real fan of this series, so I will not spread out on the story (sorry for the addicts) but the realization of this model allows me a change of register (plane, boat which are rather my cup of tea) and continue my re-launch!learning!
I wanted, through this article, to show how I proceed and thus benefit from the relevant remarks of the pros that I really appreciated during your feedback on my Bréguet! After, I know that nothing beats practice and mistakes to progress!! So I started by reading the notice completely and thus allowing myself to judge whether I should follow the entire process or modify certain actions to facilitate the task. Then, I directly primed in white all the parts on the plates: only one layer.
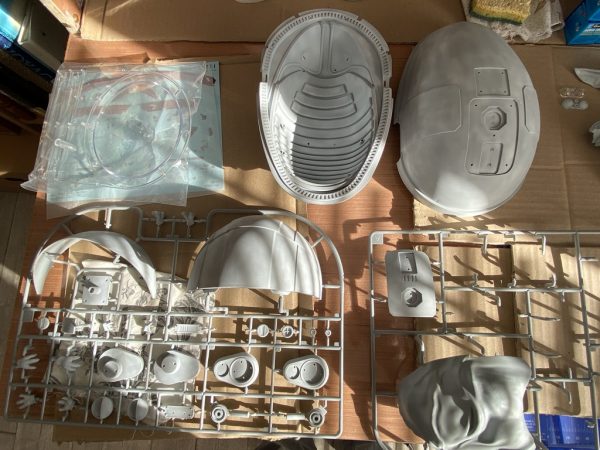
Pour la phase 2, j’ai détaché les pièces et commencé à peindre, par couleur, l’ensemble des pièces, pour utiliser toute ma peinture du godet et éviter de changer de peinture, en devant nettoyer mon aérographe toutes les 2 mn… Je l’ai fait de cette manière pour cette maquette car il n’y avait pas trop de pièces (43 pièces).
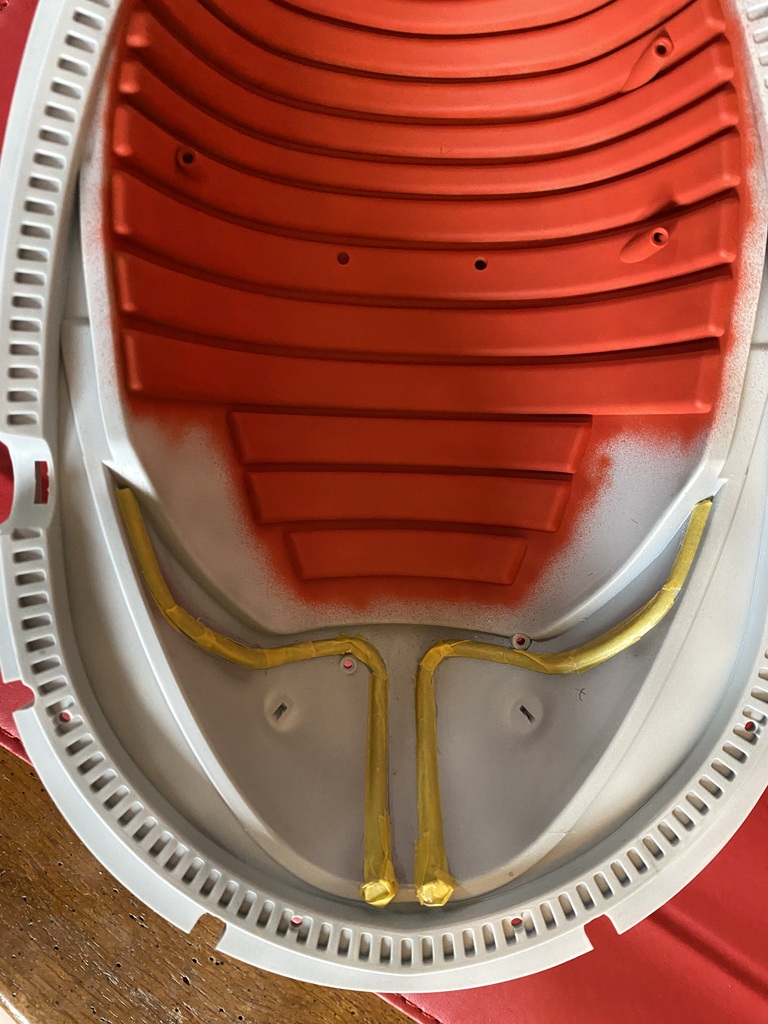
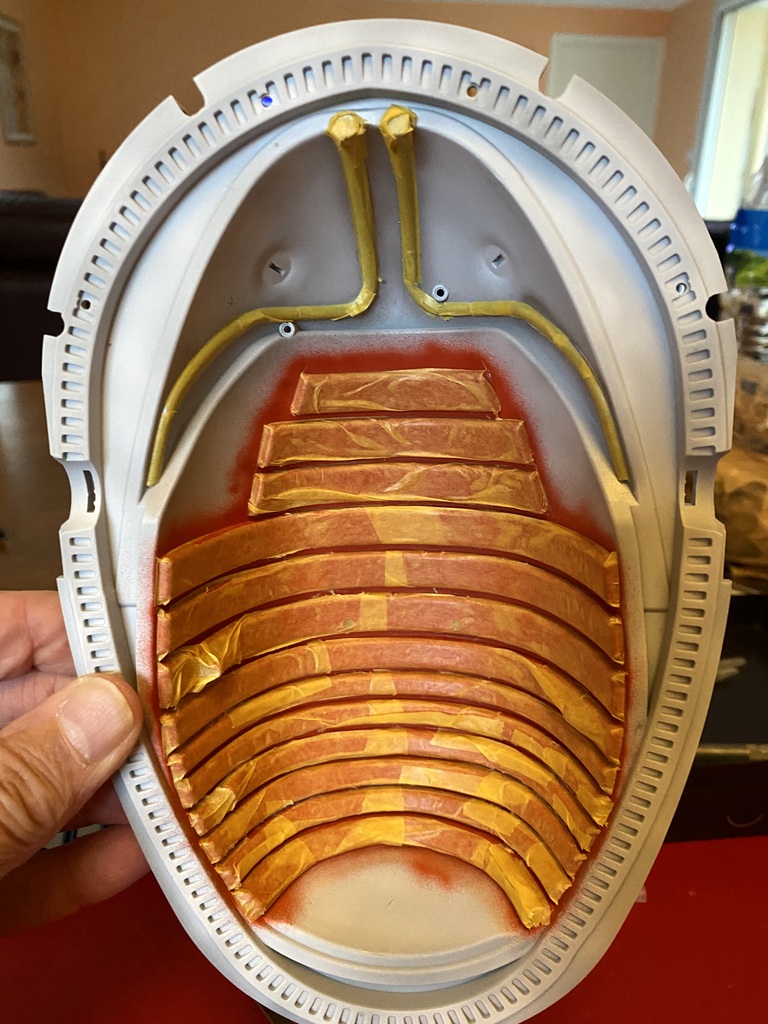
J’ai procédé également au masquage avant peinture, en utilisant le ruban de masquage Tamiya de différentes largeurs très pratiques. Là, pour l’intérieur de la coquille, ce fut un moment sympathique… Patience ! patience pour le masquage et bien sûr, lors de la mise en peinture, j’ai tout de même réussi à renverser mon godet de peinture Rouge Carmin dedans ! Chouette pour nettoyer dans les rigoles ! j’en rigole encore !! Heureusement, cette partie ne se voit pas et il n’y a que moi qui sais comment c’est dessous, Mais rassurez-vous, j’essaie d’être méticuleux et je crois que je ne m’en suis pas trop mal sorti !
For phase 2, I detached the parts and started painting, by color, all the parts, to use all my paint from the bucket and avoid changing paint, having to clean my airbrush every 2 minutes… I did it this way for this model because there were not too many parts (43 parts).
I also masked before painting, using the Tamiya masking tape of different handy widths. There, for the inside of the shell, it was a nice moment… Patience! Patience for masking and of course, when painting, I still managed to spill my bucket of Rouge Carmin paint in it! Nice to clean in the channels! I still laugh! Fortunately, this part is not visible and it is only me who knows how it is under, but rest assured, I try to be meticulous and I think I did not too badly!
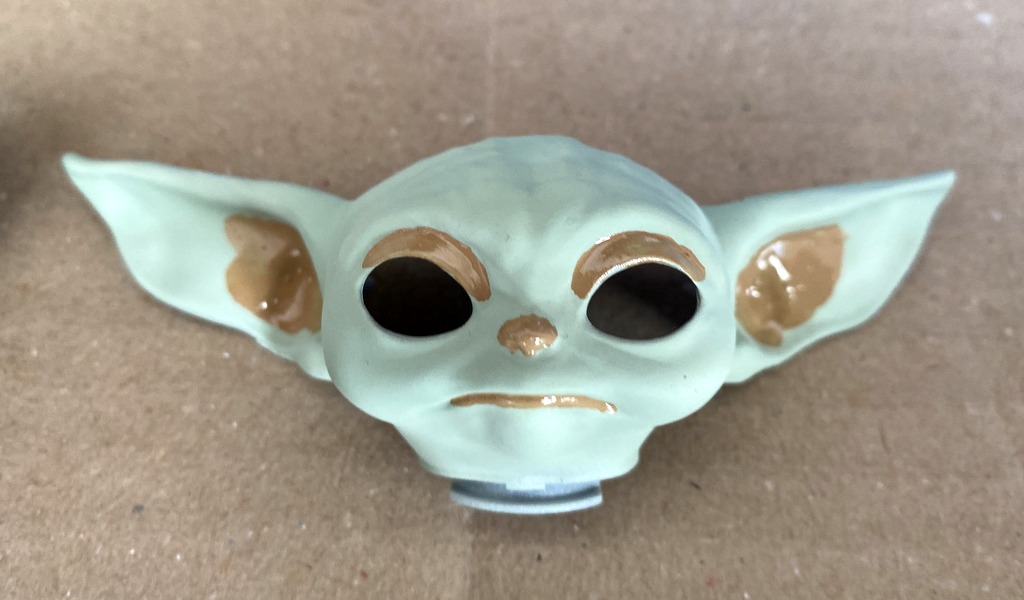

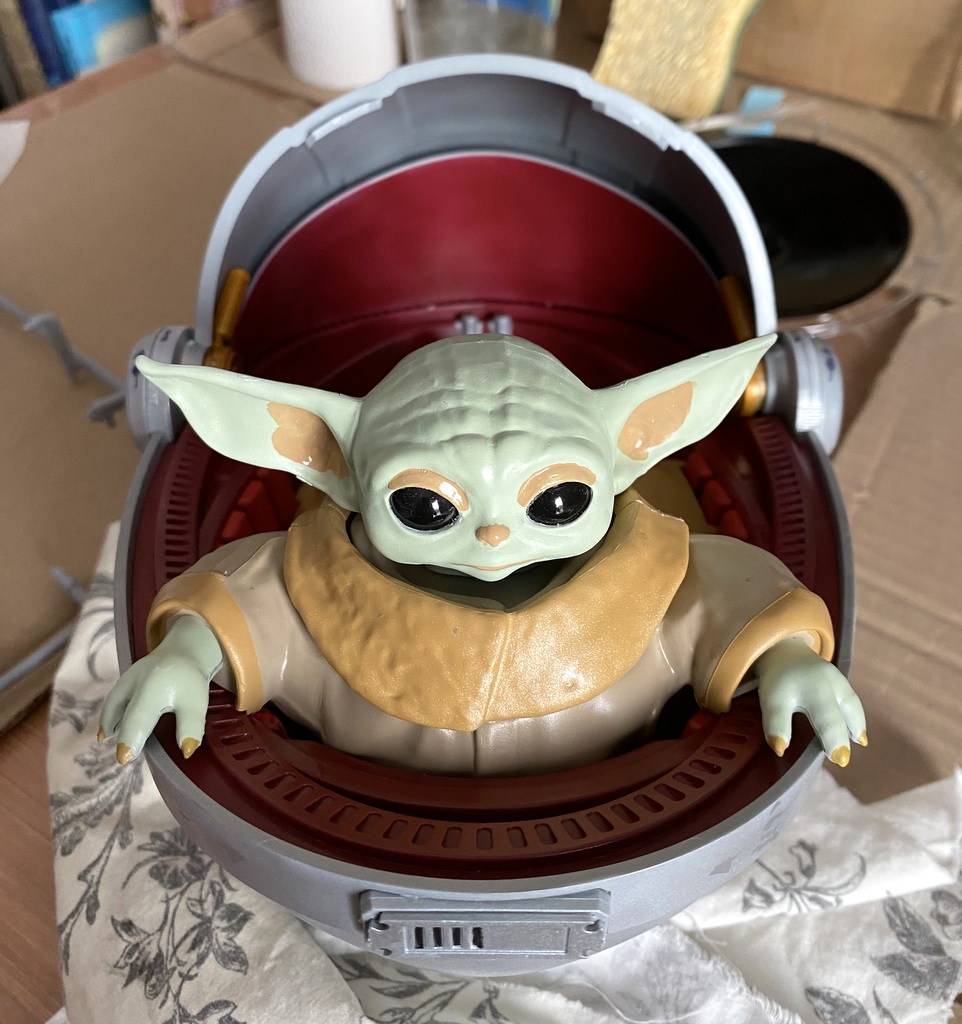
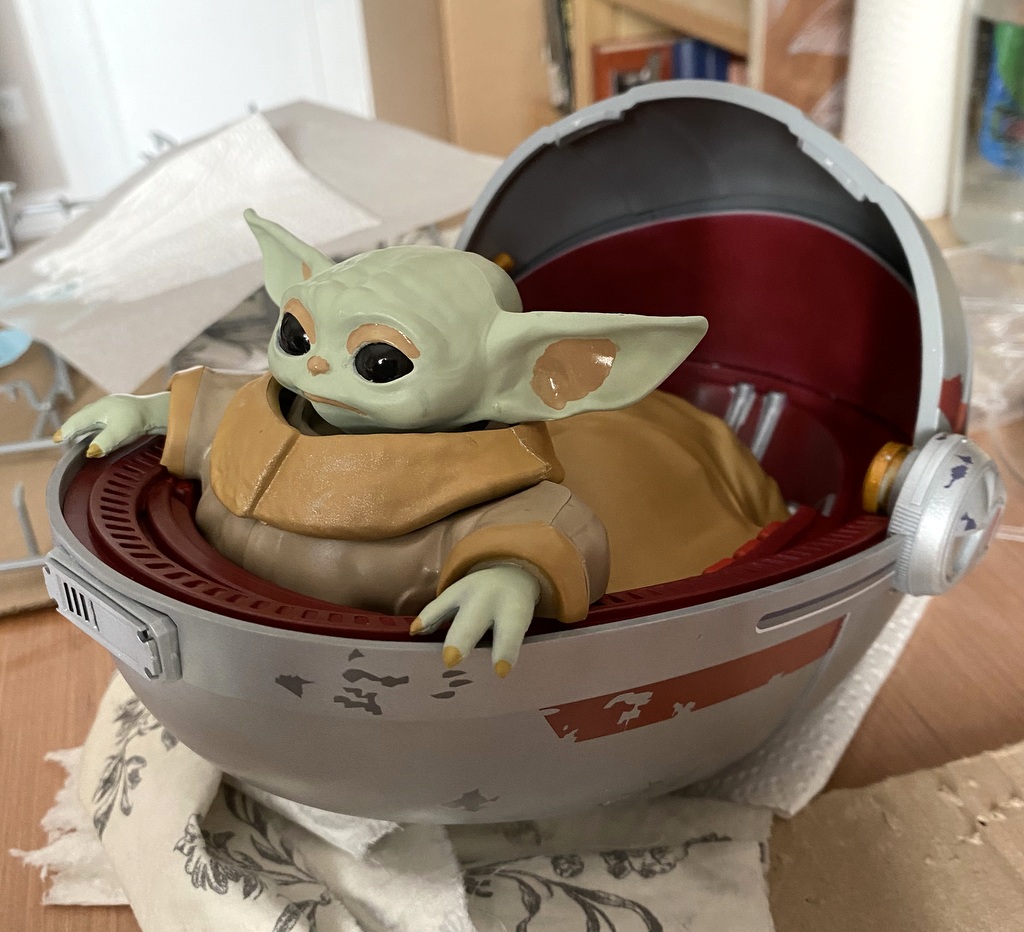
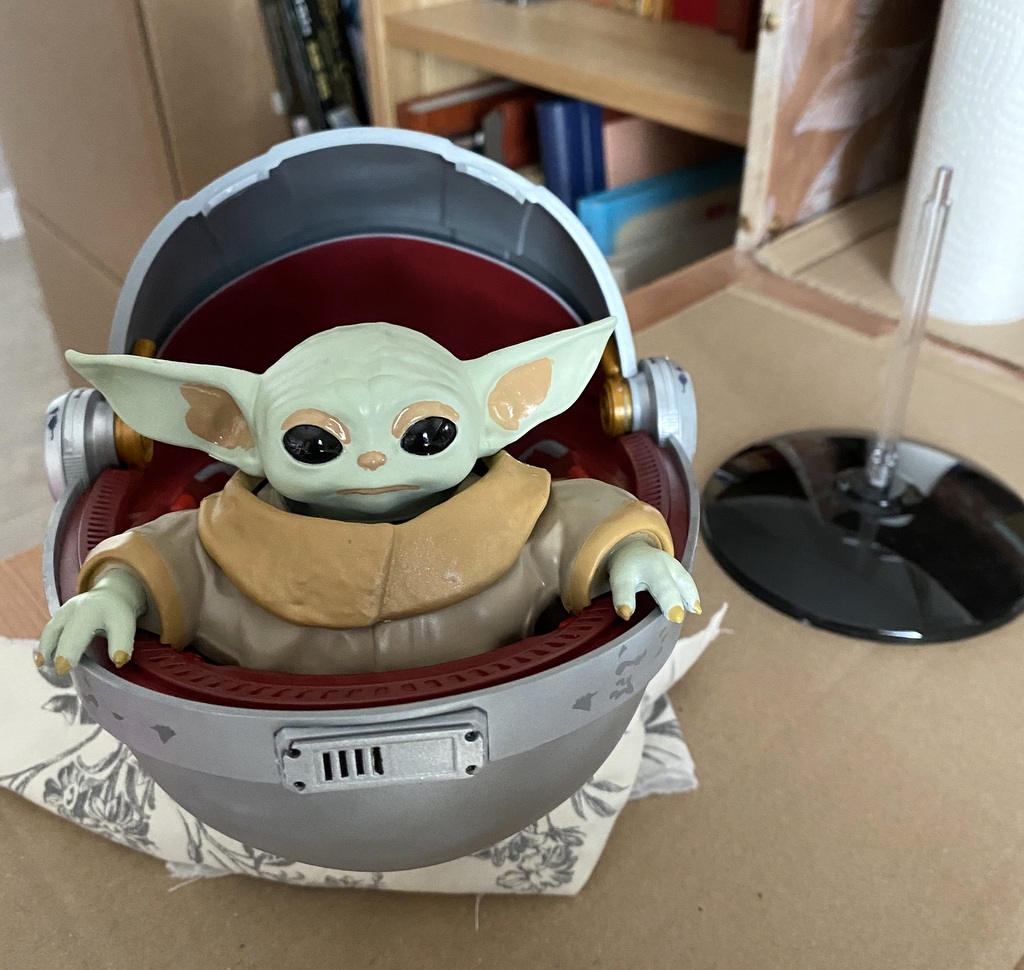
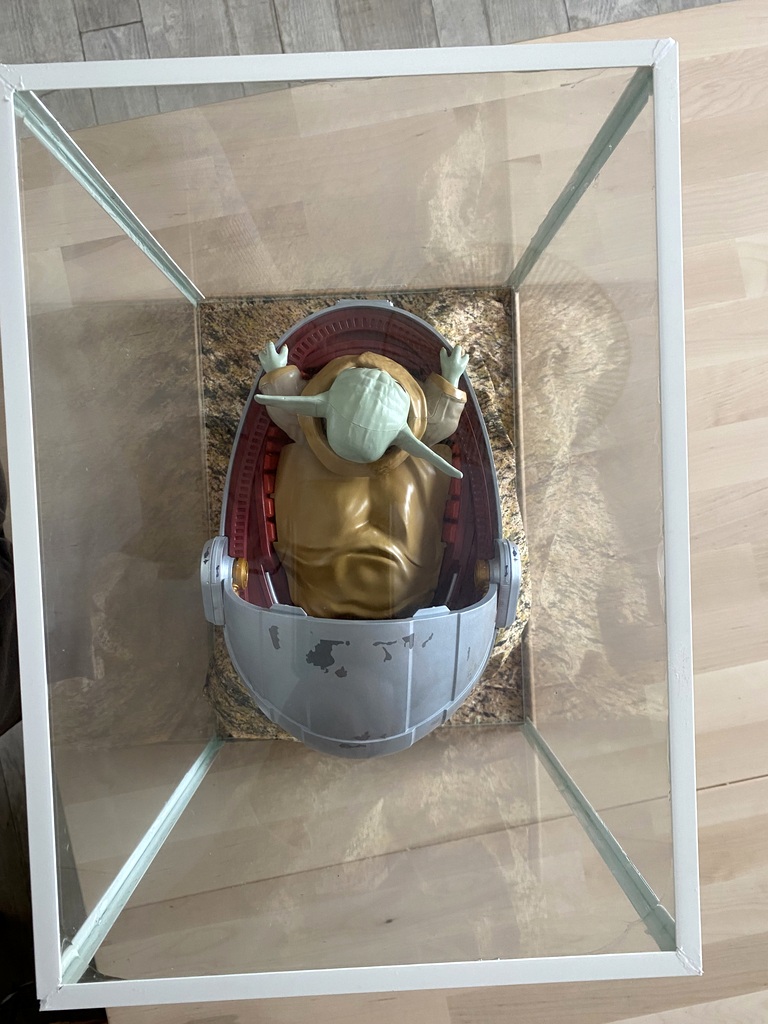
Une fois la peinture effectuée, j’ai commencé les assemblages. Pour l’assemblage, cela ne s’est pas trop mal passé ! le petit personnage Grogu a été collé en respectant les consignes ! sa tête tourne bien. Je l’ai ensuite maintenue sur les points de pression avec des élastiques et pour les autres pièces j’ai fait la même action en utilisant en plus du ruban de masquage pour certaines pièces. Chacune des actions de collage que j’ai pu effectuées, a nécessité une journée de séchage ! Il faut dire, que ce soit des actions de collage ou de mise en peinture, j’ai pris l’habitude de garder une journée complète pour que cela sèche correctement.
Once the painting was done, I started the assemblies. For the assembly, it did not go too badly! The little character Grogu was glued following the instructions! his head turns well. I then held it on the pressure points with elastics and for the other parts I did the same action by using in addition to the masking tape for some parts. Each of the gluing actions that I made, required a day of drying! It must be said, whether it is gluing or painting actions, I have become accustomed to keep a full day for it to dry properly.

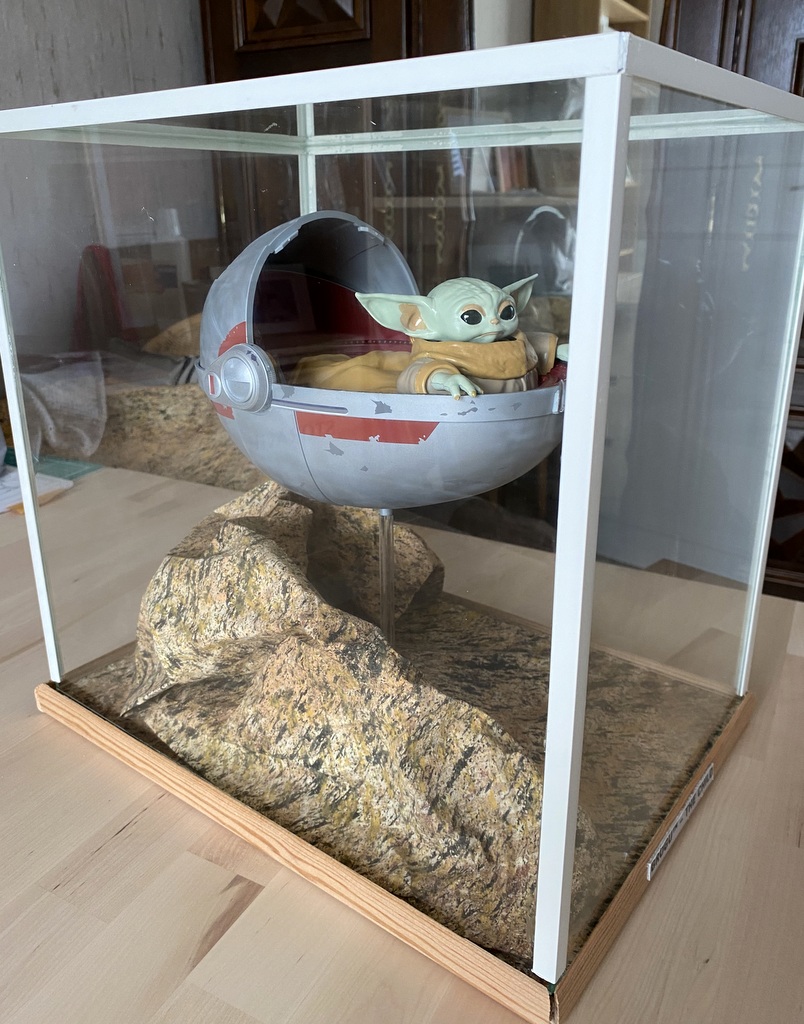
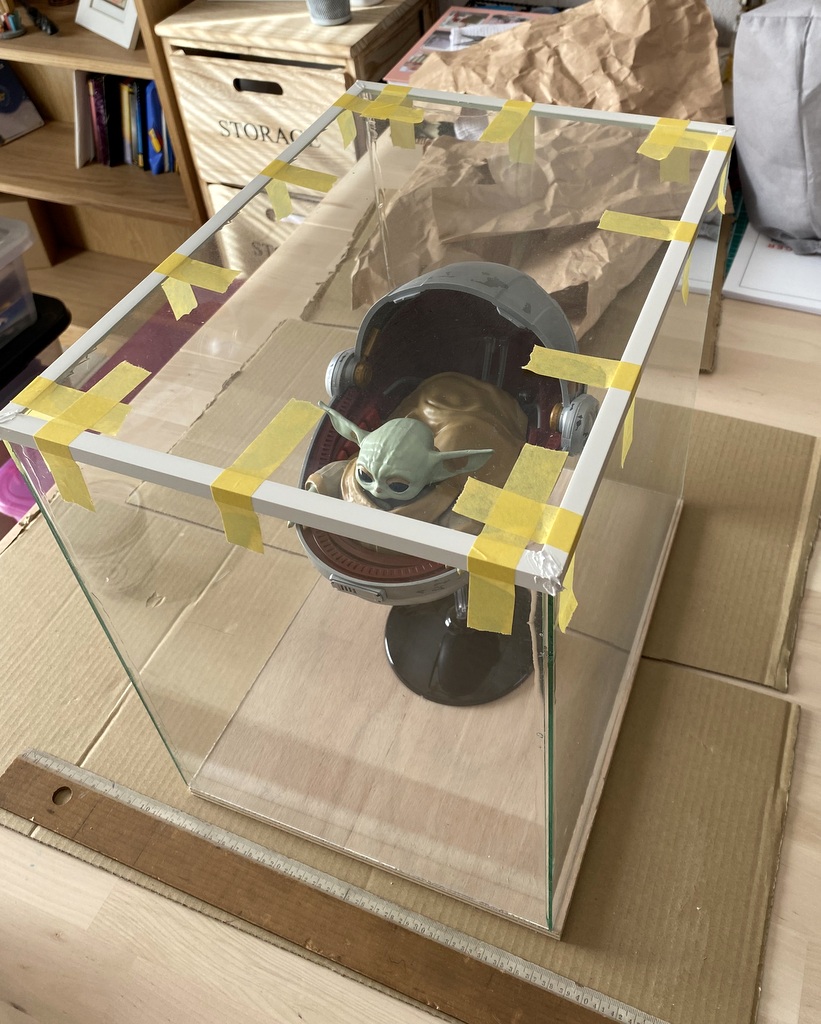
Ensuite, j’ai passé une couche de verni brillant et j’ai fini d’assembler le personnage dans sa drôle de Coquille !! Le verni sec, j’ai posé les décalques comme on me l’avait conseillé (vos retours !!) en n’omettant pas de mettre le fixateur puis, calque posé, l’assouplisseur, J’ai ainsi fini avec une couche de verni mat. Et comme ce personnage, que l’on m’a offert, j’avais décidé de l’offrir à un fervent du Mandalorian ; je me suis dit, pourquoi pas le mettre en vitrine avec un décor pour plus de cachet …?
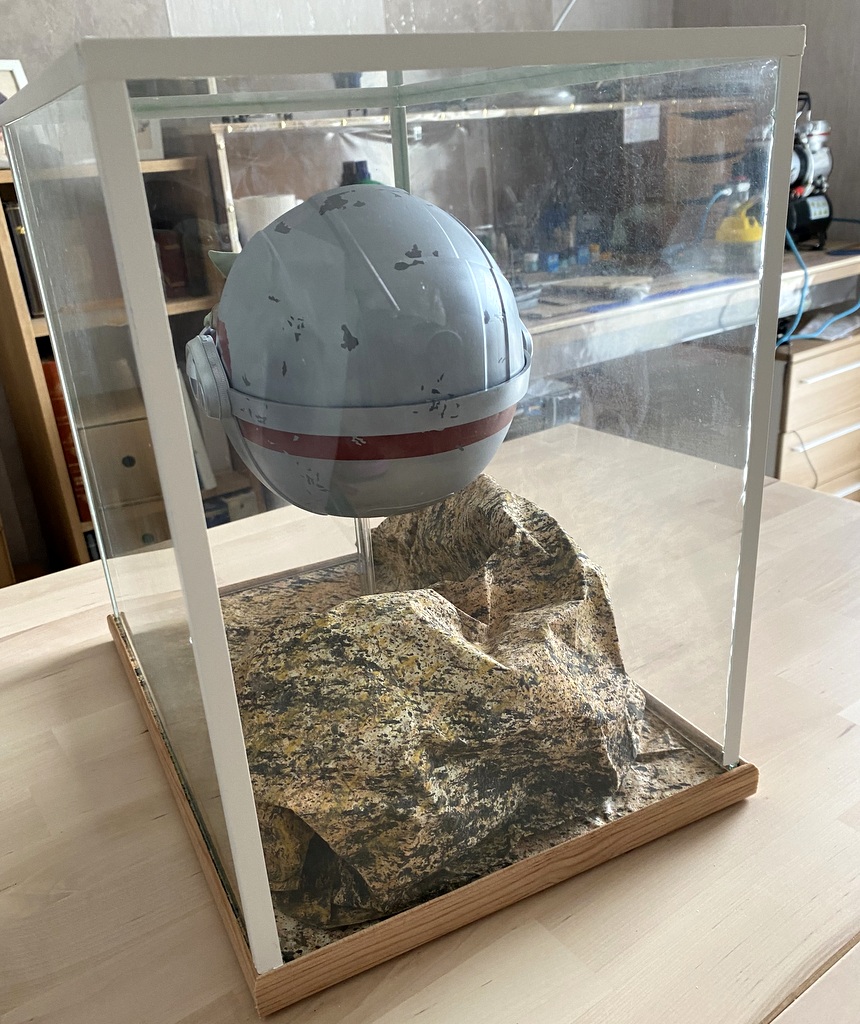
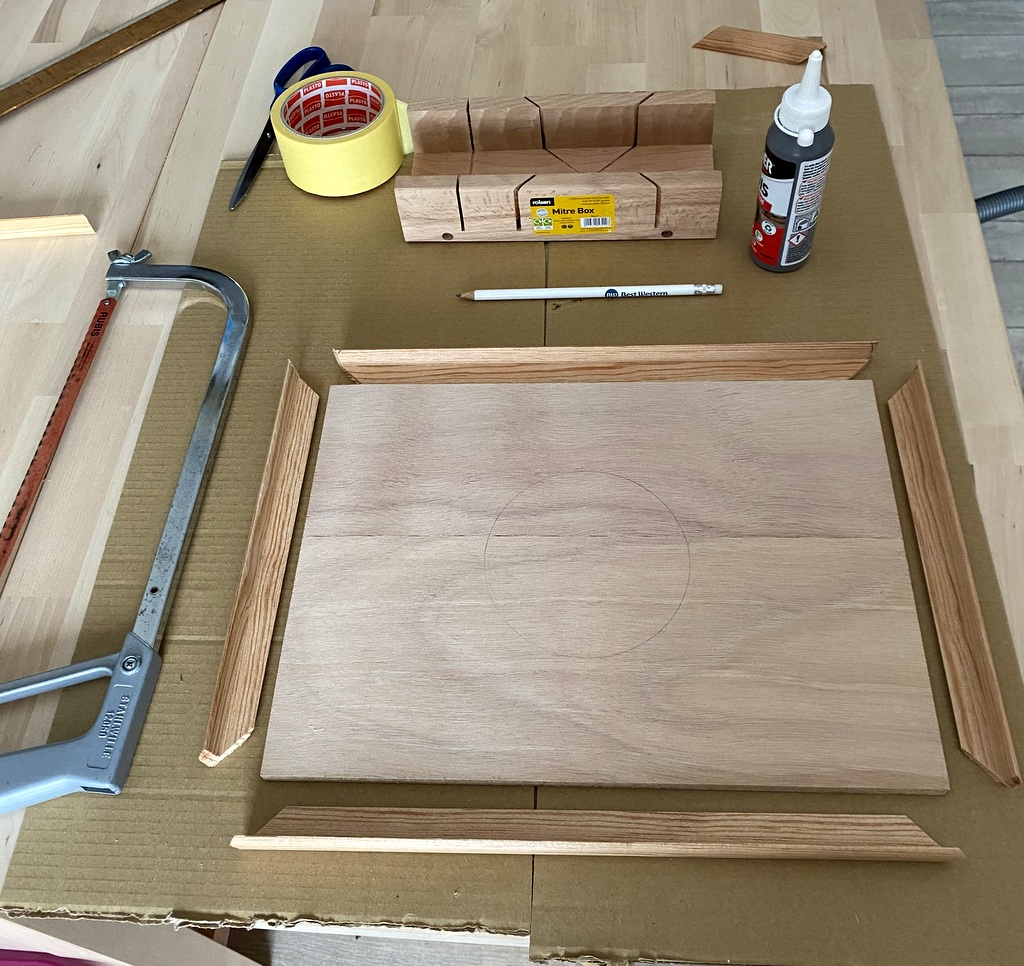
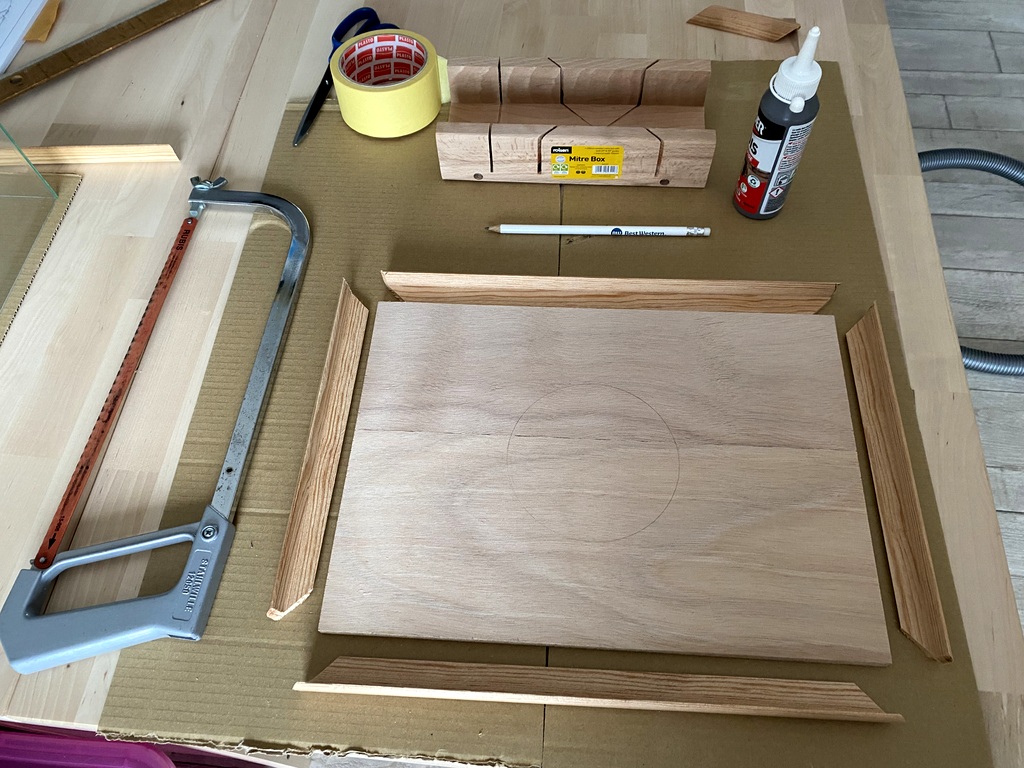
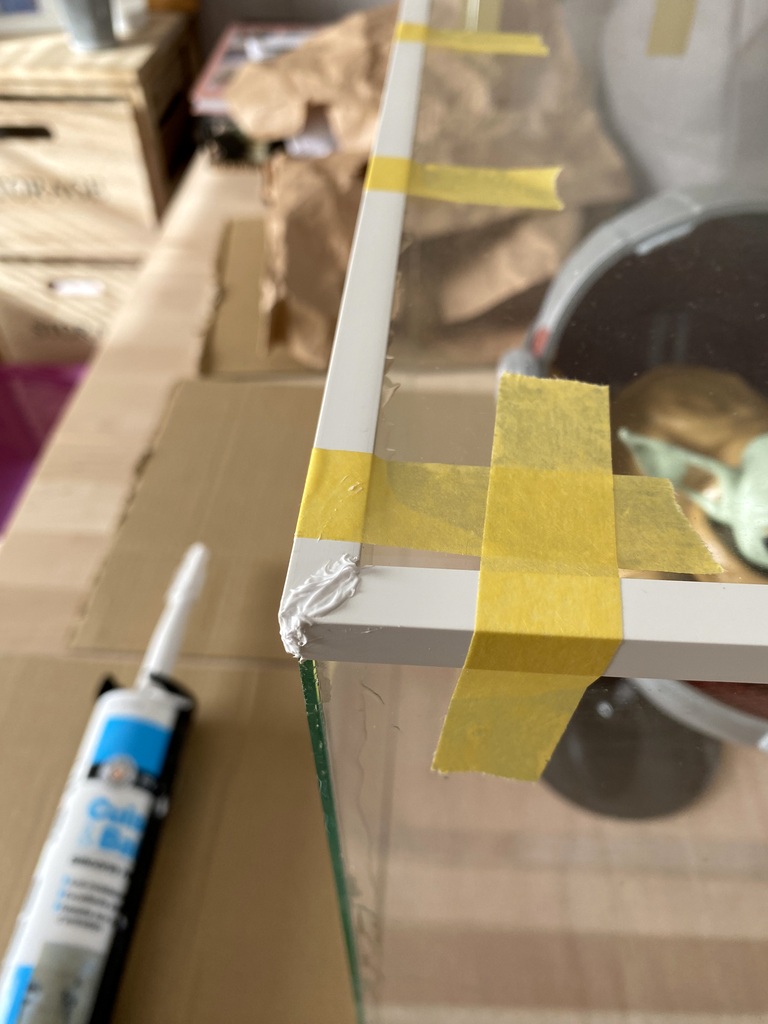
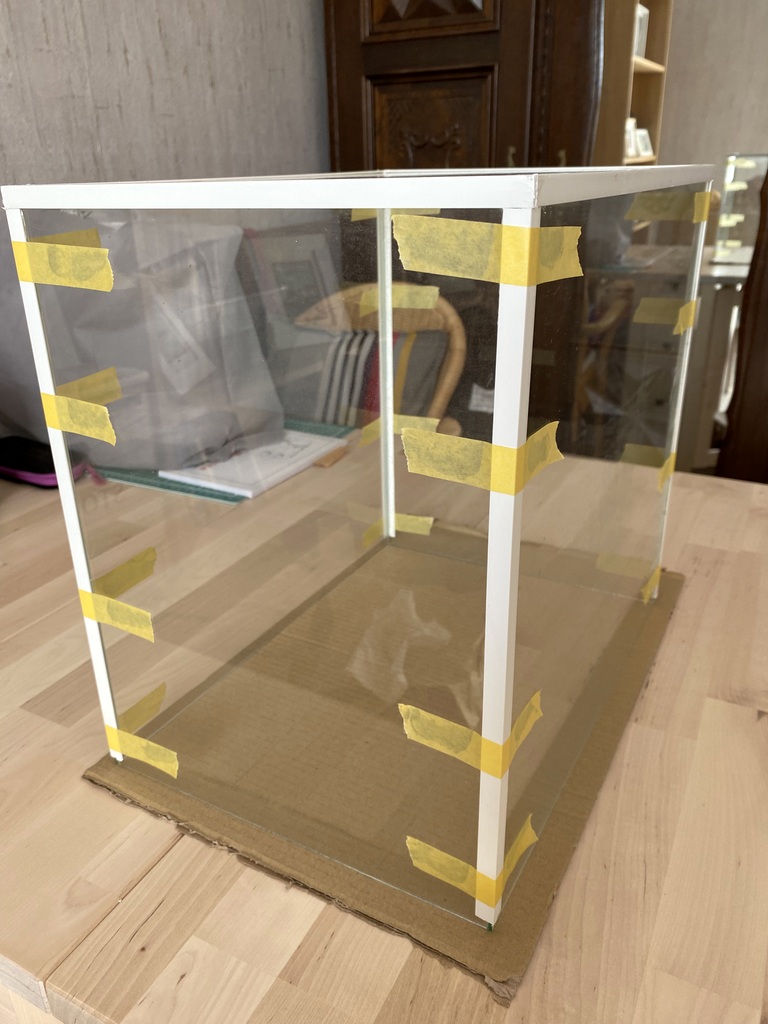
Alors je me suis lancé sur la création d’une vitrine et d’un décor. Pour la vitrine, merci à mon cher et vénéré Président de m’avoir accompagné au mieux de ce qu’il pouvait faire face à une personne comme moi… Un peu lent à la détente !! (je me moque, bien sûr !!) Pas toujours évident, par visio, de comprendre certaines subtilités, mais je pense que bon nombre ont dû connaître, comme tout démarrage, quelques moments de solitude ! Néanmoins, je suis venu à bout de la vitrine avec quelques ajouts pour combler mon manque de précision, notamment dans la découpe des angles pour les baguettes d’encadrement !! Vive le silicone blanc !! Ah, j’oubliais !! Non, je n’ai pas découpé le verre, ni d’ailleurs le support bois, je les ai faits faire !! Alors, ça peut avoir du bon, mais la coupe peut aussi avoir ses imperfections !!
Then I passed a layer of glossy varnish and I finished assembling the character in its funny shell! The varnish dry, I put the decals as I was advised (your feedback!!) not forgetting to put the fixator then, layer laid, softener, I ended with a layer of matte varnish. And as this character, whom I was offered, I had decided to offer it to a devotee of the Mandalorian; I thought, why not put it in the window with a decor for more cachet …?
So I started creating a showcase and a decor. For the showcase, thank you to my dear and venerable President for having accompanied me to the best of what he could do to a person like me… A little slow to relax!! (I mock, of course!) Not always easy, by video, to understand some subtleties, but I think that many must have known, like any start, some moments of solitude! Nevertheless, I came to the end of the window with some additions to fill my lack of precision, especially in the cutting of the corners for the framing rods! Long live the white silicone!! Ah, I forgot!! No, I did not cut the glass, nor the wooden support, I made them! So, it can have good, but the cut can also have its imperfections!
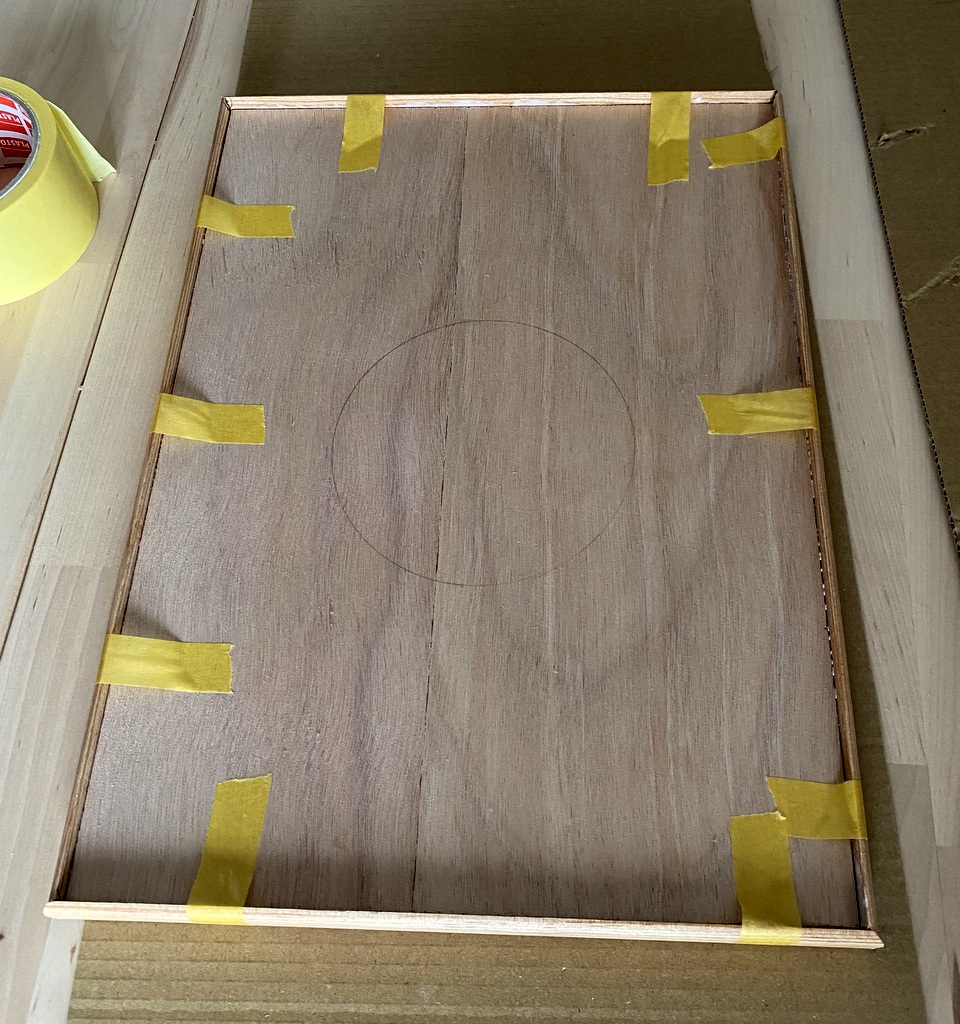
Pour ce faire, dans l’assemblage, et le collage, idem temps de repos pour le séchage ! Une fois la vitrine prête, les baguettes d’encadrement en PVC, misent en place tout d’abord sur le haut de la vitrine ; puis j’ai dû attendre de finaliser le support bois pour positionner la vitrine dessus et ainsi prendre la bonne mesure des tasseaux des baguettes latérales, car le rebord du support bois étant légèrement rehaussé pour maintenir la vitrine en place, les baguettes ne couvrent pas l’intégralité du verre (en bas ) J’espère que c’est clair …
La création du support bois a été aussi très intéressante !! Choisir la bonne dimension des tasseaux, disposer du matériel pour découper les angles et bien sûr, savoir l’utiliser !!! J’ai pu me rendre compte que ce n’est pas si simple au démarrage et même après quelques essais, à l’arrivée aussi !! Mais, c’est comme cela que l’on apprend !! et finalement, je trouve que je ne m’en suis pas trop mal sorti avec l’aide du silicone ! Ha Ha !!
To do this, in assembly, and gluing, same time rest for drying! Once the showcase is ready, the PVC framing sticks, put in place first on the top of the showcase; then I had to wait to finalize the wooden support to position the showcase on and thus take the right measure of the cleats of the side sticks, because the edge of the wood support is slightly raised to keep the showcase in place, the rods do not cover the entire glass (bottom ) I hope it is clear …
The creation of the wood support was also very interesting! Choose the right size of the cleats, have the material to cut corners and of course, know how to use it!! I was able to realize that it is not so easy at the start and even after a few tries, at the finish too! But, that’s how we learn! and finally, I think I did not too badly with the help of silicone! Ha Ha!!
Phase 7 création Décor
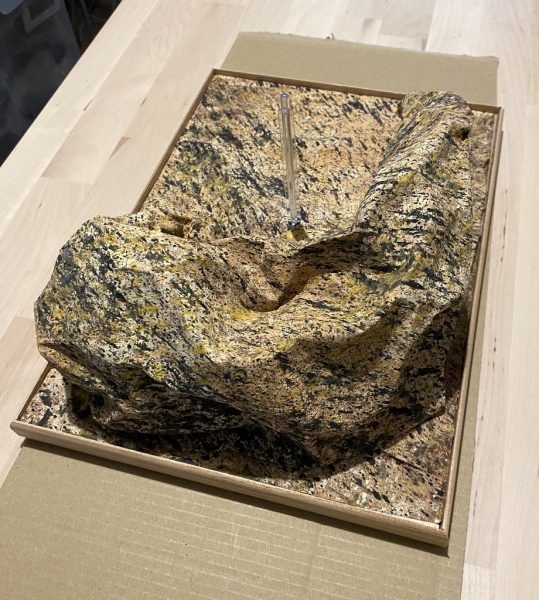
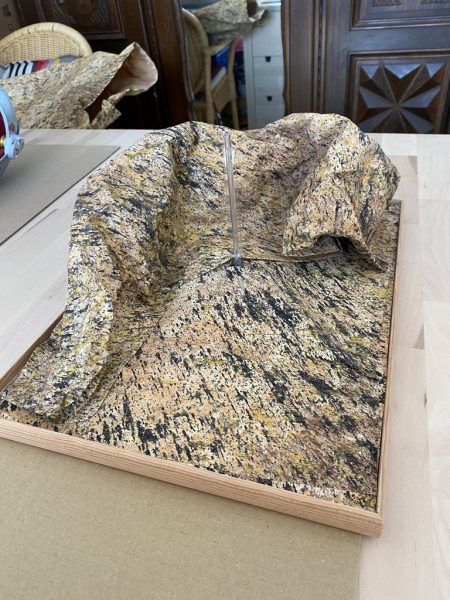
Pour la décoration, là il faut dire que malgré une tempête de cerveau, je n’ai pas été très inspiré et je me suis dit que la création d’un diorama, c’est vraiment quelque chose à part !!! Quand je découvre dans Campi et le retour des expos, ce qui est fait !!! Chapeau !!! C’est magique !! Et je pense qu’il faut avoir également sur ce sujet une bonne connaissance pour mettre en situation une maquette et lui donner ainsi vie !!
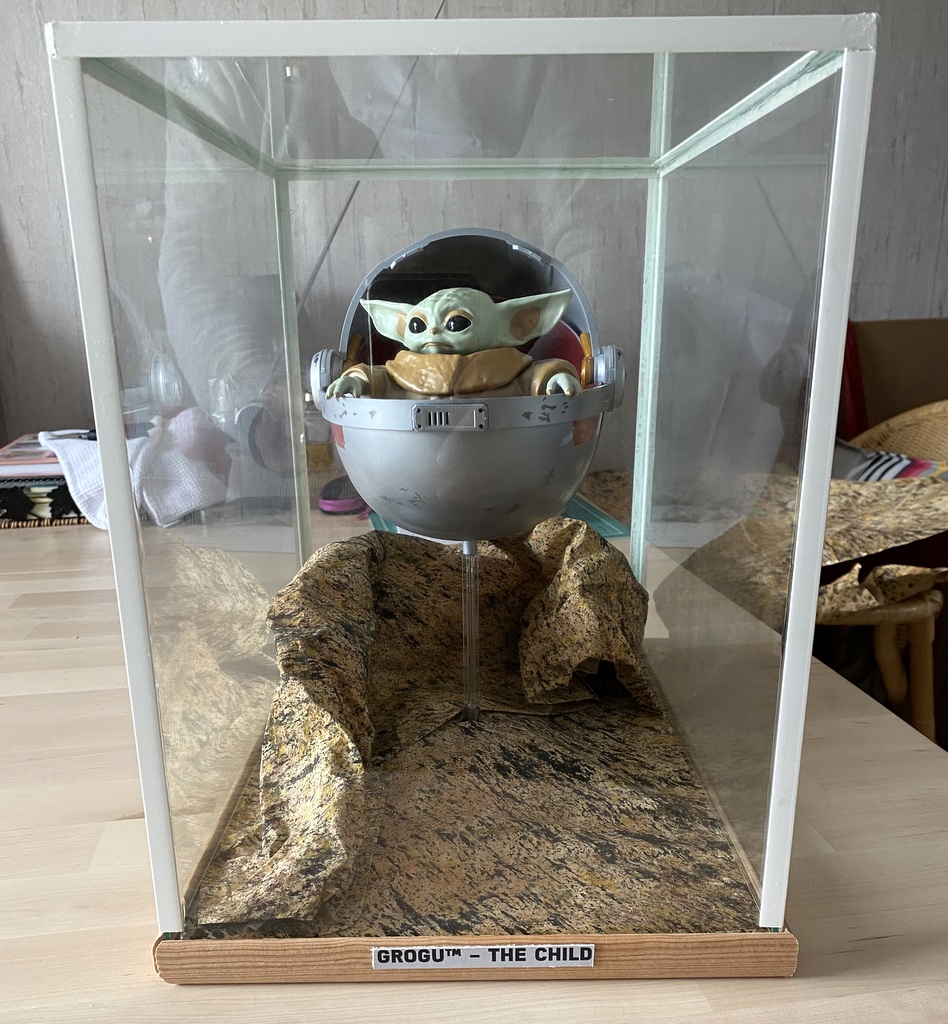
J’adore cet aspect-là mais j’ai encore fort à faire !! Pour ma décoration, j’ai craqué !! je l’avoue, j’ai été faire les cartons de Noël dans mon garage et j’ai piqué la déco de la crèche de Jésus !! Dieu me pardonne et ma moitié également ! J’ai donc, avec le papier spécifique déco de Noël, créé ( c’est un bien grand mot …) ma déco d’un monde inconnu ( oui.. il faut de l’imagination …) pour intégrer ensuite mon petit personnage Grogu.
Phase 7 creation Decor
For the decoration, it must be said that despite a brain storm, I was not very inspired and I told myself that creating a diorama is really something apart!! When I discover in Campi and the return of the exhibitions, what is done!!! Hat! It’s magic!! And I think that we must also have on this subject a good knowledge to put in situation a model and thus give it life!
I love this aspect but I still have a lot to do! For my decoration, I cracked!! I confess, I went to make the Christmas boxes in my garage and I stole the decoration of the crib of Jesus! God forgives me and my half too! So I created with the specific Christmas decoration paper ( it’s a big word …) my decoration of an unknown world ( yes.. it takes imagination …) to integrate then my little character Grogu.
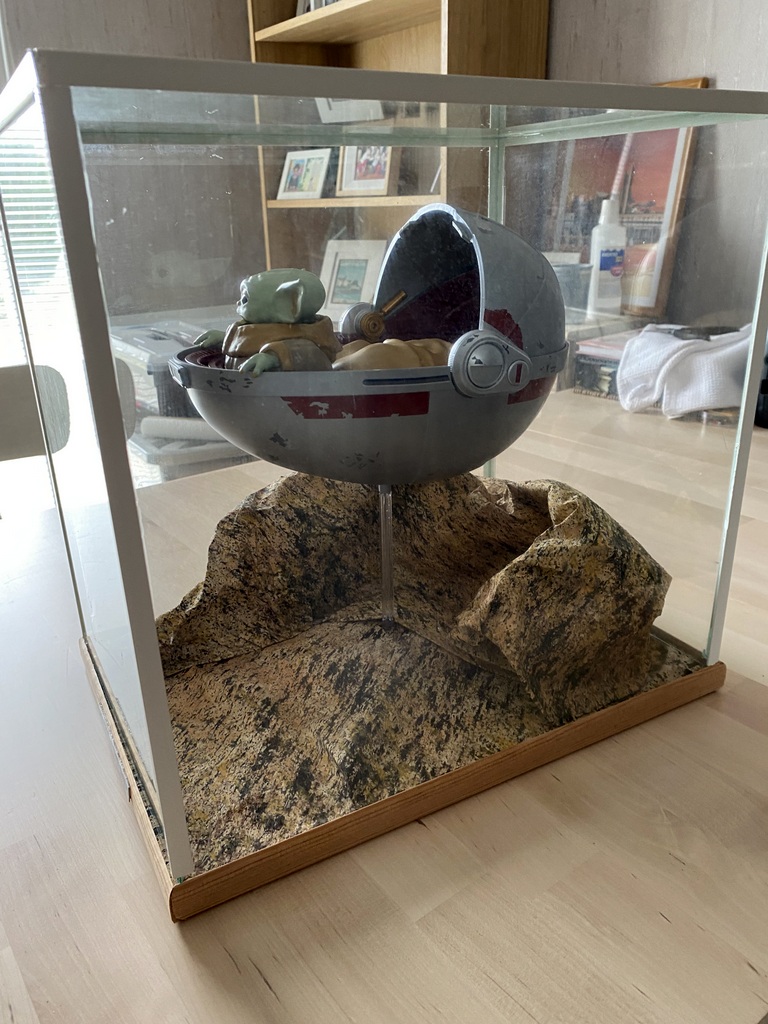
Voilà la vitrine finalisée. Une remarque, que j’ajouterai, concerne également la qualité du verre que j’ai acheté. Une partie du verre était très sale (quasiment incrusté) je ne l’avais vue que lors de la création de la vitrine. Et malgré un nettoyage poussé avec des produits classiques vitre, le verre n’est pas revenu vraiment bien… Les conseils sont les bienvenus… Et voilà mon assemblage final dans toute sa splendeur !! oui, je sais c’est simple ! je ferai mieux, je l’espère, la prochaine fois ! Et j’espère également que ce cadeau qui est, je le rappelle, destiné à un fervent, ne le fasse pas changer de passion en voyant ce chef-d’œuvre !! Voilà comment je procède donc lorsque je me lance dans la maquette. Je me suis fait un pense-bête, selon les conseils avisés de notre cher Président, que je vous partage. N’hésitez pas dans vos remarques à compléter !!
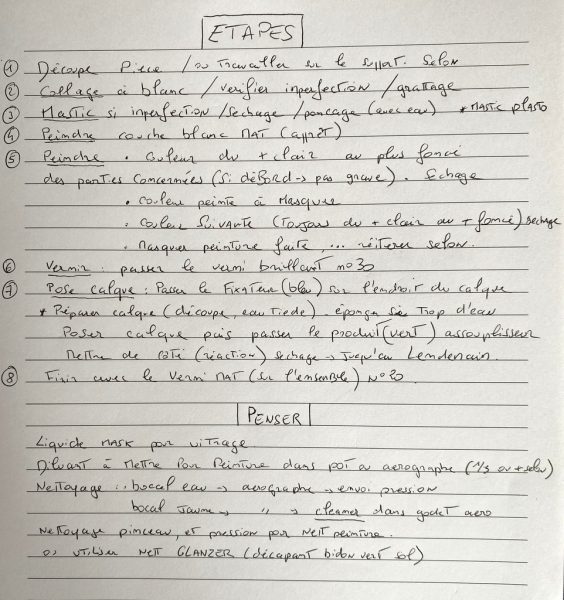
Pense-bête :
That’s the completed showcase. One comment, I’ll add, is also about the quality of the glass I bought. Part of the glass was very dirty (almost inlaid) I had only seen it when creating the showcase. And despite a thorough cleaning with classic glass products, the glass did not come back really well… Advice is welcome… And here is my final assembly in all its splendor! yes, I know it’s simple! I will do better, I hope, next time! And I also hope that this gift, which is, I remind you, intended for a fervent, does not change his passion by seeing this masterpiece! This is how I proceed when I launch into the model. I made myself a reminder, according to the advice of our dear President, that I share with you. Do not hesitate to complete your remarks!!
Reminder: