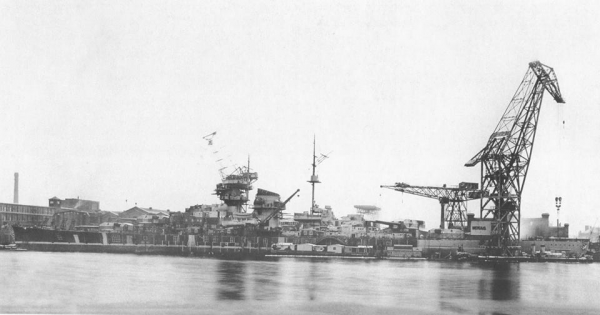
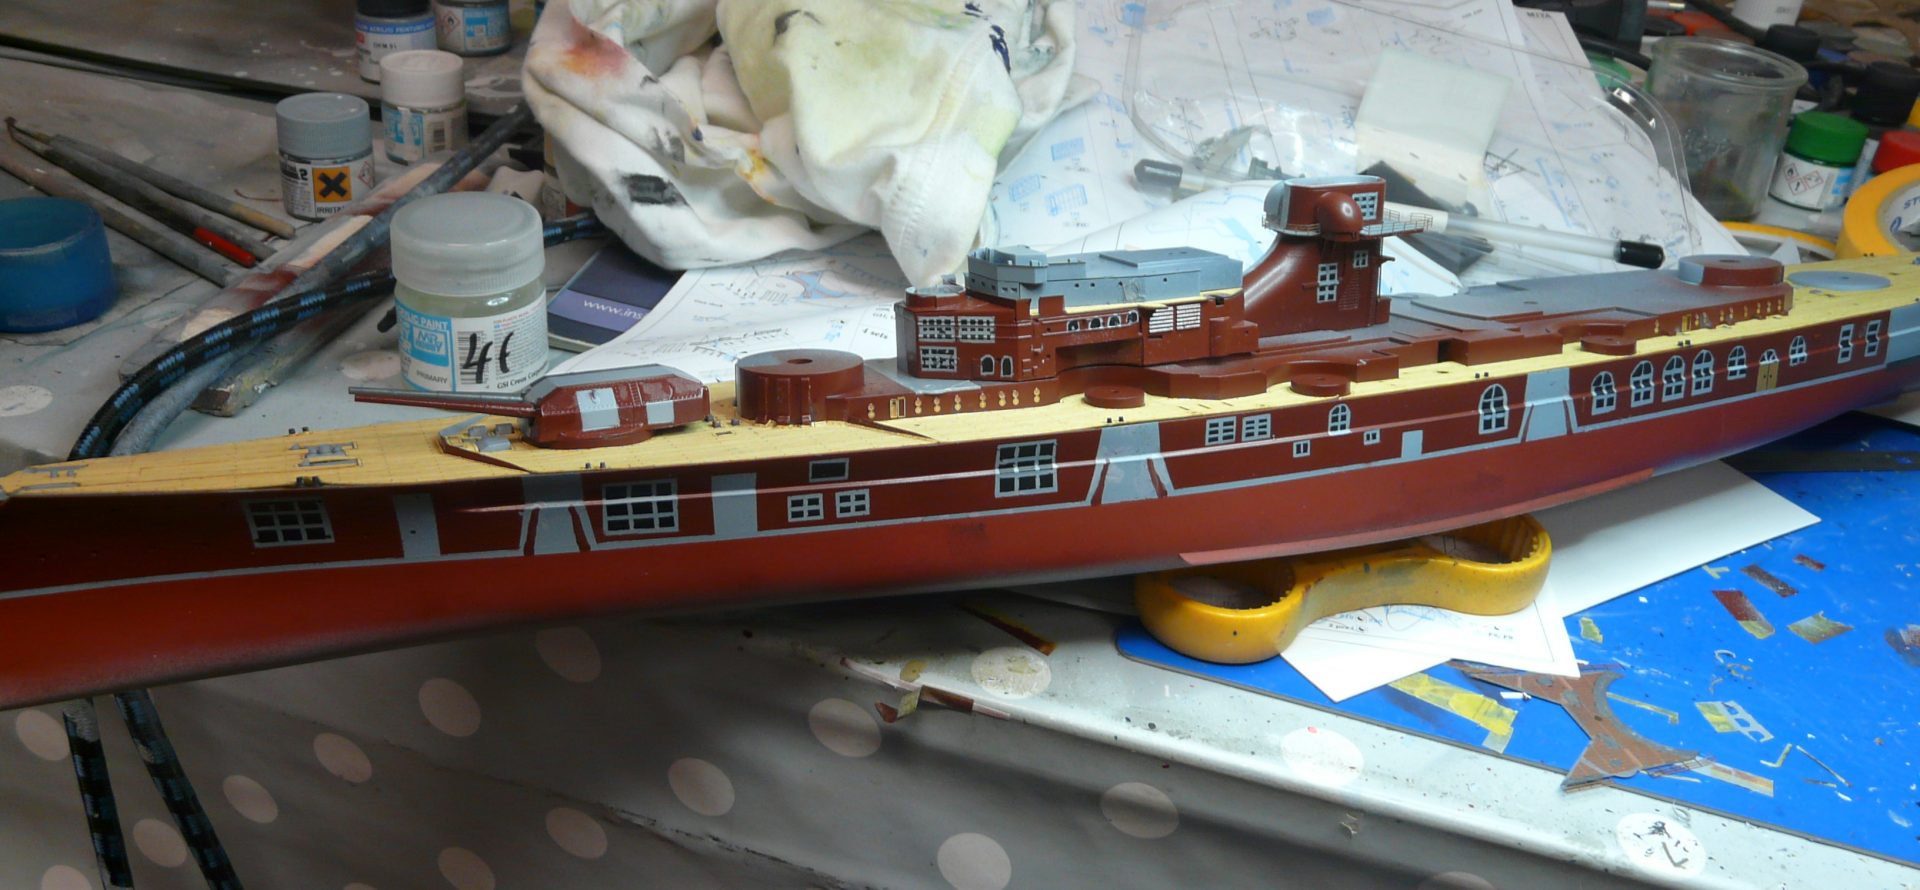
Après avoir réalisé le diorama « TIRPITZ dans son fjord en Norvège » (voir articles précédants) et au cours de mes recherches de documentation sur le net, j’avais « tilté » sur des photos du TIRPITZ en construction dans l’arsenal de la ville de Wilhelmshaven en bordure de la mer du Nord en 1940. Pour l’intégrer dans le paysage urbain, les allemands l’avaient entièrement repeint couleur « façade de maisons » et agrémenté la coque, les canons et les supers structures de grandes fenêtres. Les images d’époque sont extrêmement rares. Et il faut vraiment le voir pour le croire.
After making the diorama «TIRPITZ in its fjord in Norway» (see previous articles) and during my research of documentation on the net, I had «tilted» on photos of the TIRPITZ under construction in the arsenal of the city of Wilhelmshaven on the edge of the North Sea in 1940. To integrate it into the urban landscape, the Germans had completely repainted it in colour «house facade» and embellished the hull, cannons and super structures of large windows. Period images are extremely rare. And you really have to see it to believe it.


Pour moi, la tentation était grande de se lancer dans ce défi peinture. L’avantage de ce genre de diorama, c’est qu’il n’y a aucune marque de nazisme, puisque les bateaux, voulant se faire discrets n’arboraient aucun pavillon. Un bon projet qui alimentera sûrement les conversations, les critiques et les interrogations sur le stand CAMPI. En tous cas, une occasion de mettre ce grand navire en valeur malgré sa courte carrière qui n’a duré que quatre ans.
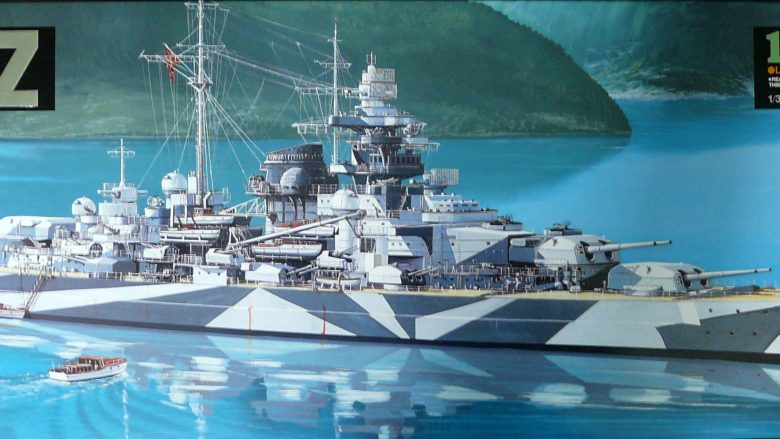
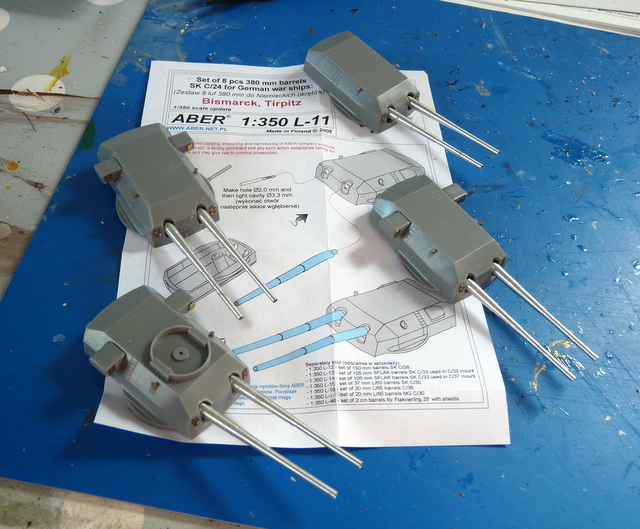
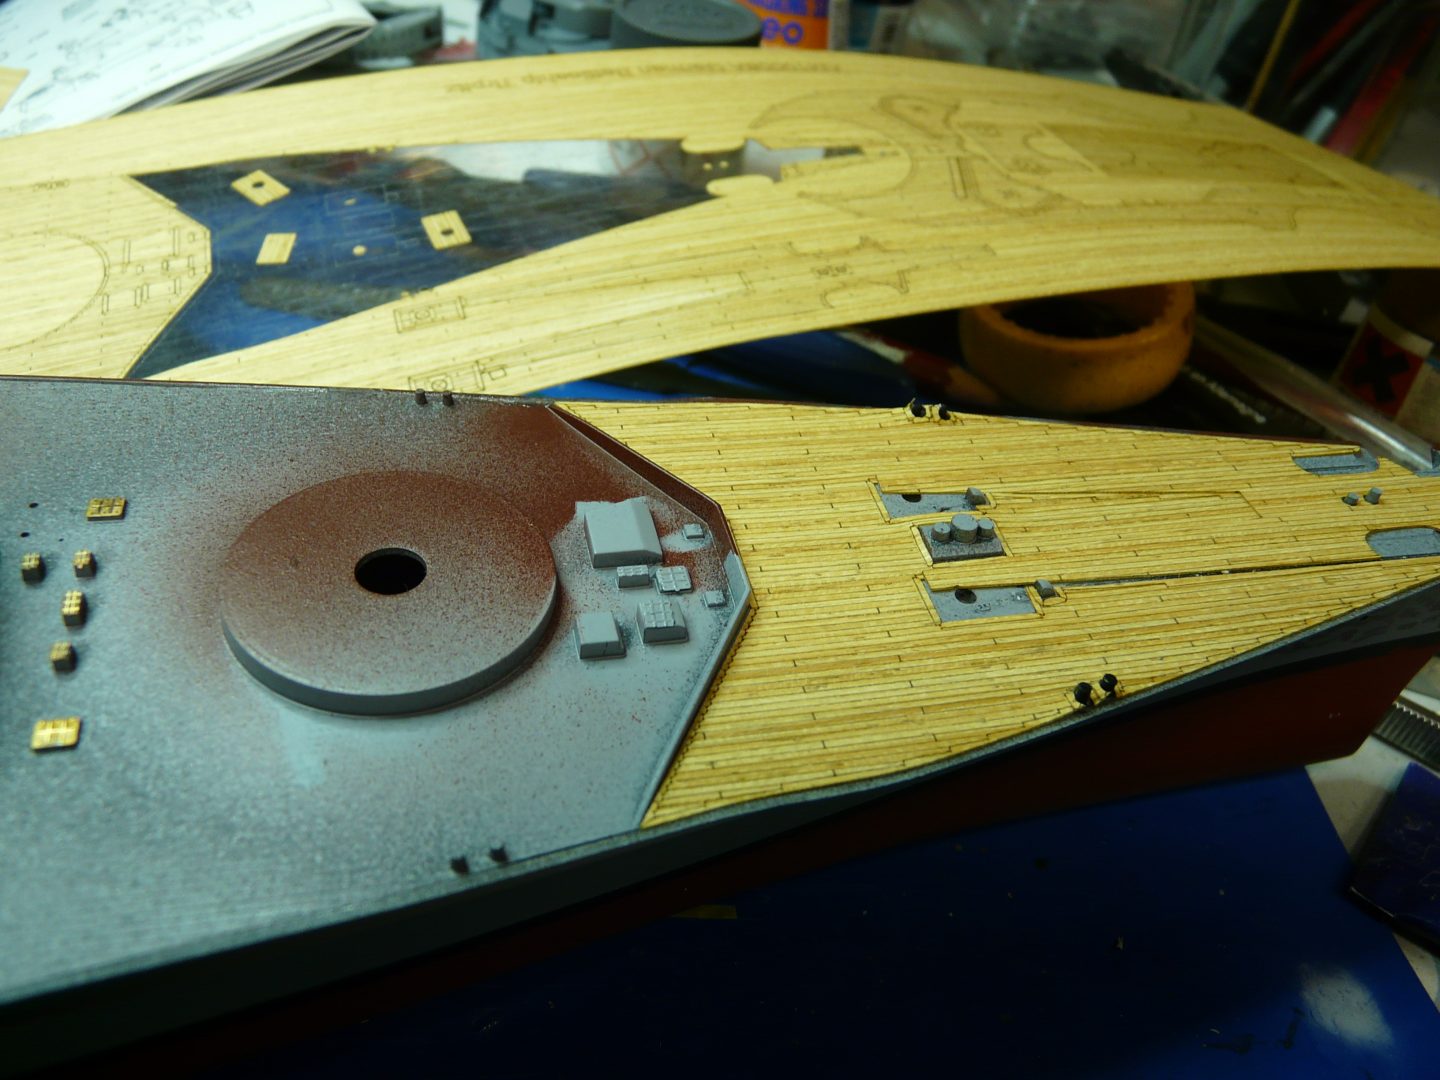
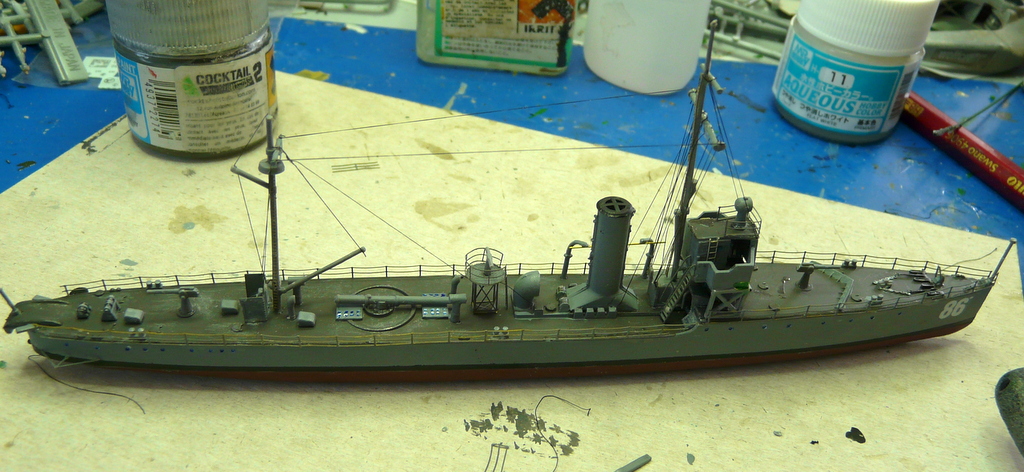
Le défi, n’est pas simple. Le très beau kit REVELL étant hors catalogue, je me suis rabattu sur le bon kit TAMIYA. Il date de 1978 le pépère, le moulage révèle bien cette époque (bien plus sommaire que le REVELL), plus économique aussi. J’y ai ajouté la photodec EDUARD, un pont en bois, les mats et les canons en métal….. Il ne reste plus qu’à attaquer. Le tout au 350 ème, cela fera à peu près la même taille que le diorama précédant du TIRPITZ dans son fjord.
For me, the temptation was great to embark on this painting challenge. The advantage of this kind of diorama is that there is no sign of Nazism, since the boats, wanting to be discreet, had no flag. A good project that will surely fuel conversations, criticisms and questions on the CAMPI stand. In any case, an opportunity to showcase this great ship despite its short career that lasted only four years.
The challenge is not simple. The beautiful REVELL kit being out of the catalogue, I went for the right TAMIYA kit. It dates back to 1978 the Pépère, the moulding reveals well this period (much more basic than the REVELL), also more economical. I added the EDUARD photodec, a wooden bridge, the masts and the metal cannons….. All that remains is to attack. All in 350 th, it will be about the same size as the TIRPITZ’s previous diorama in its fjord.
Dans ma recherche de doc, j’ai trouvé deux dioramas déjà réalisés, probablement au 700 ème du TIRPITZ dans cette situation et également un plan couleur et un plan 3 D. Curieusement, aucun n’est similaire. Donc pas de souci, j’ai fait un melting-pot de tout cela pour sortir ma propre version.
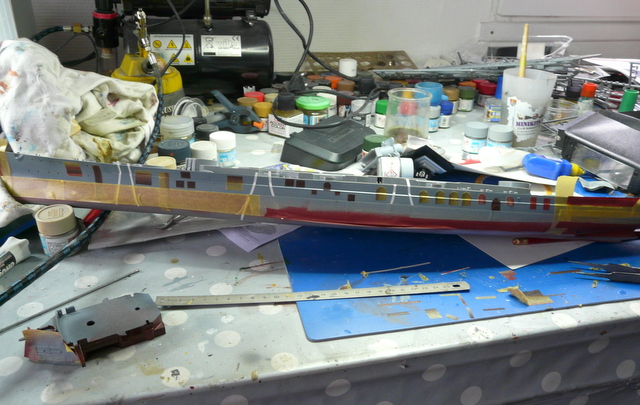
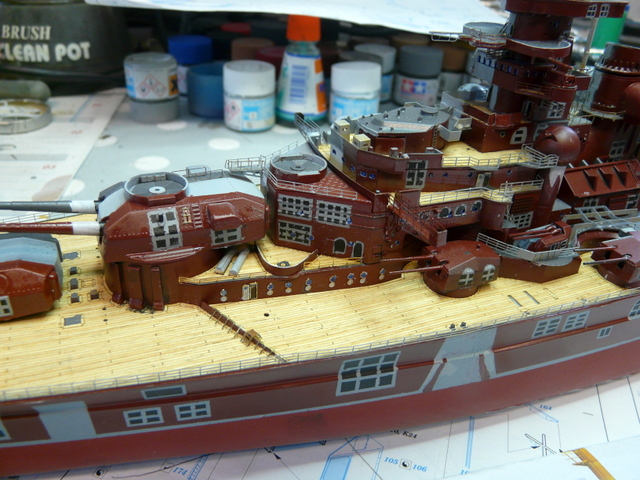
Le montage du TIRPITZ TAMIYA ne pose aucun problème, tout va «pilpoil». La technique de peinture est toujours la même, à si, une petite variante, ce coup-ci, j’ai fait un apprêtage en noir mat.
In my search for doc, I found two dioramas already made, probably in the 700 th of the TIRPITZ in this situation and also a color plane and a 3 D plane. Curiously, none is similar. So no worries, I did a melting pot of all this to release my own version.
Mounting the TIRPITZ TAMIYA is no problem, everything is «pilpoil». The painting technique is always the same, if, a small variant, this time I did a primer in matt black.
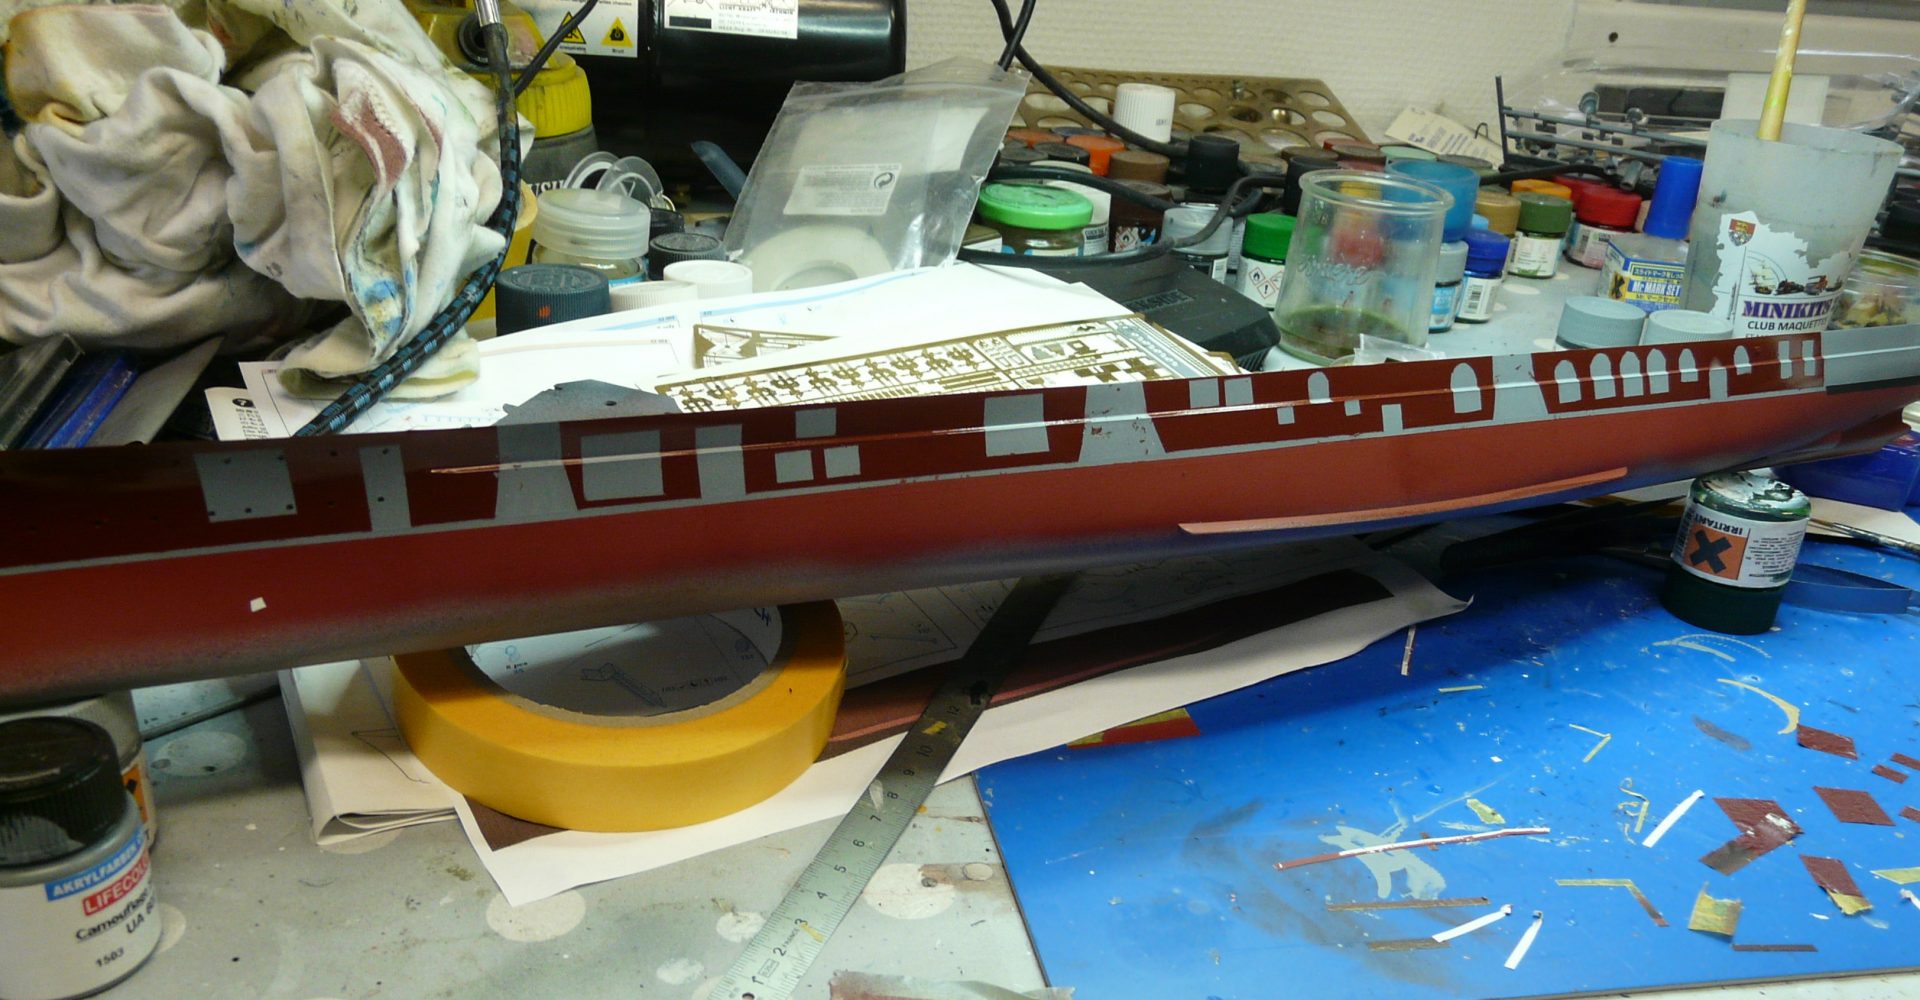
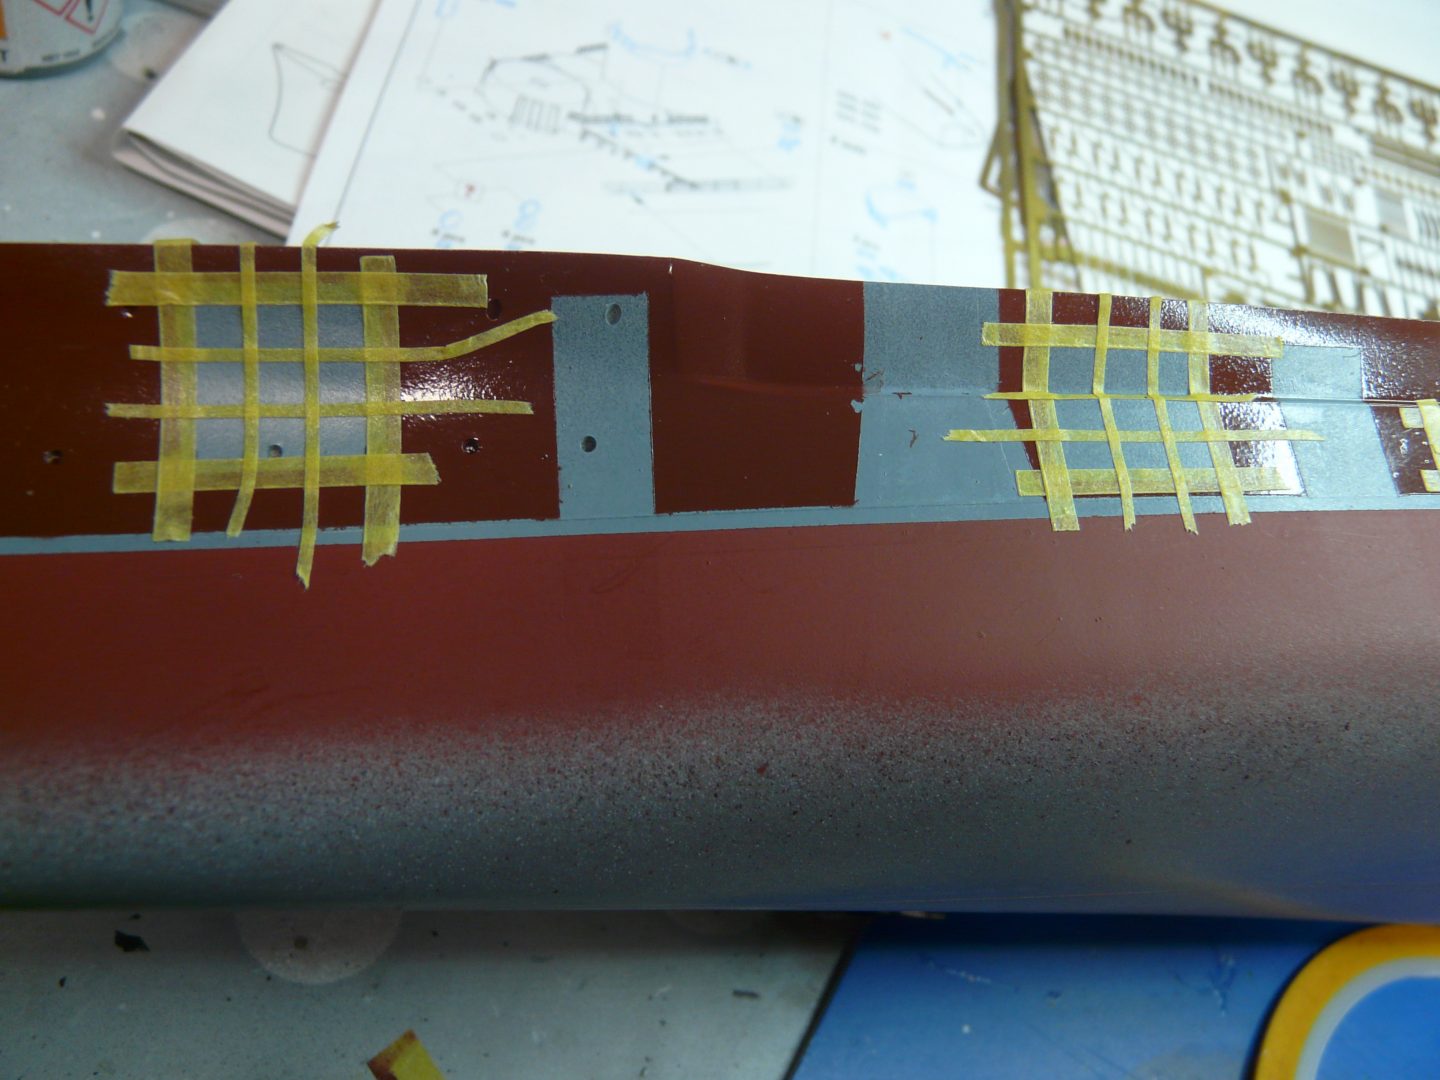
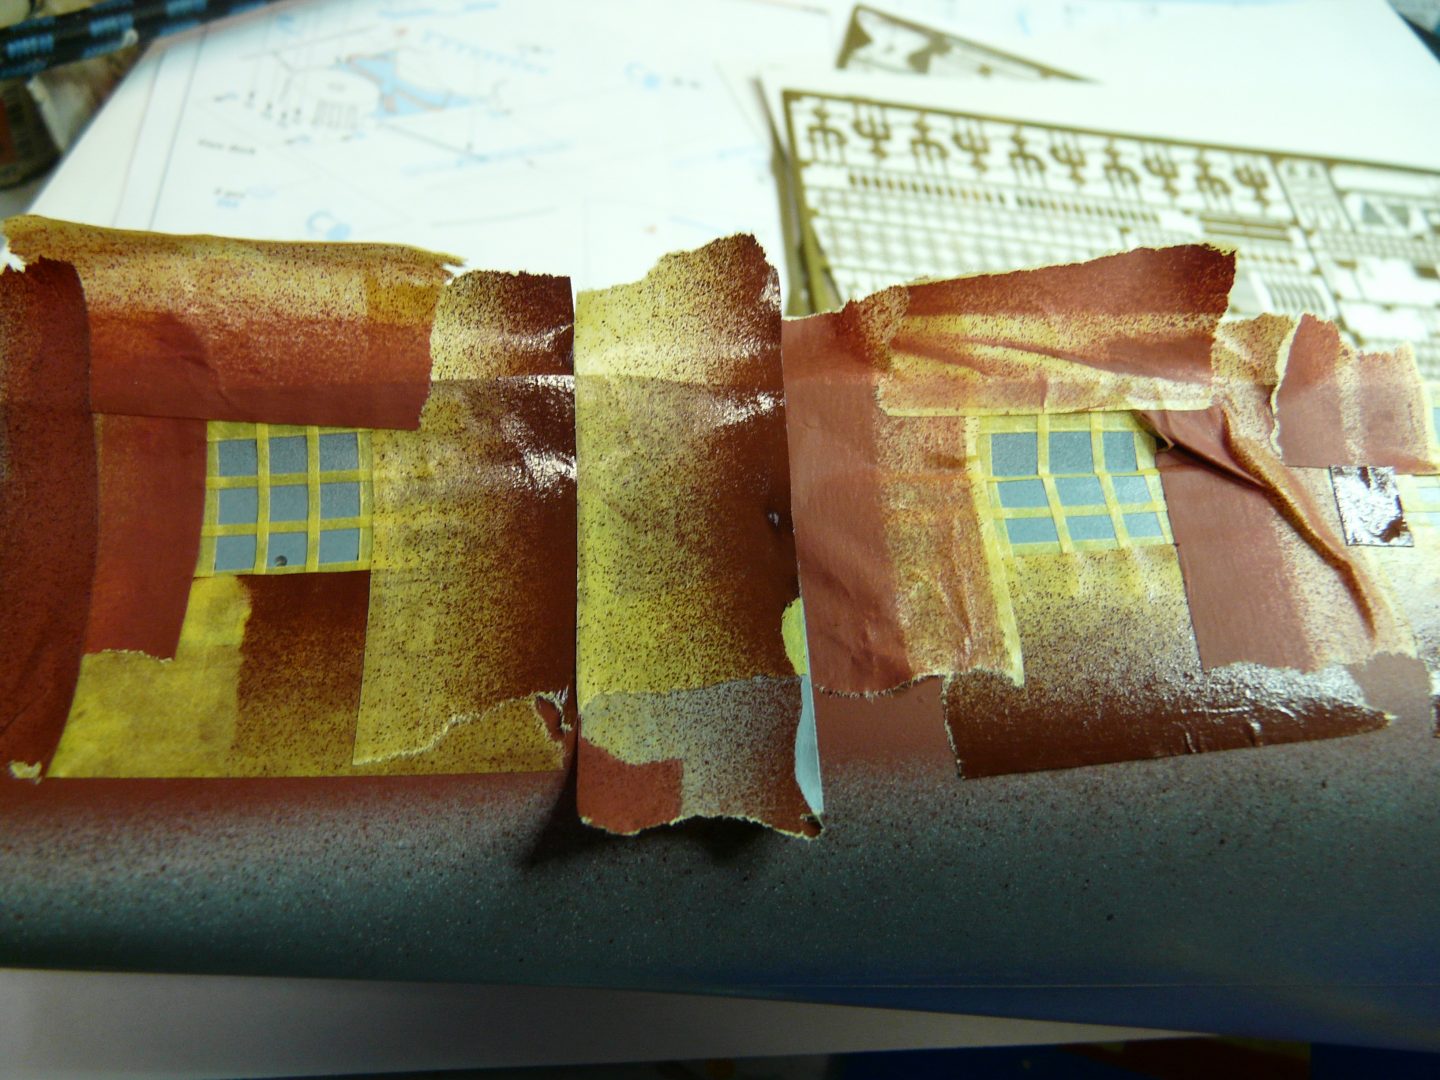
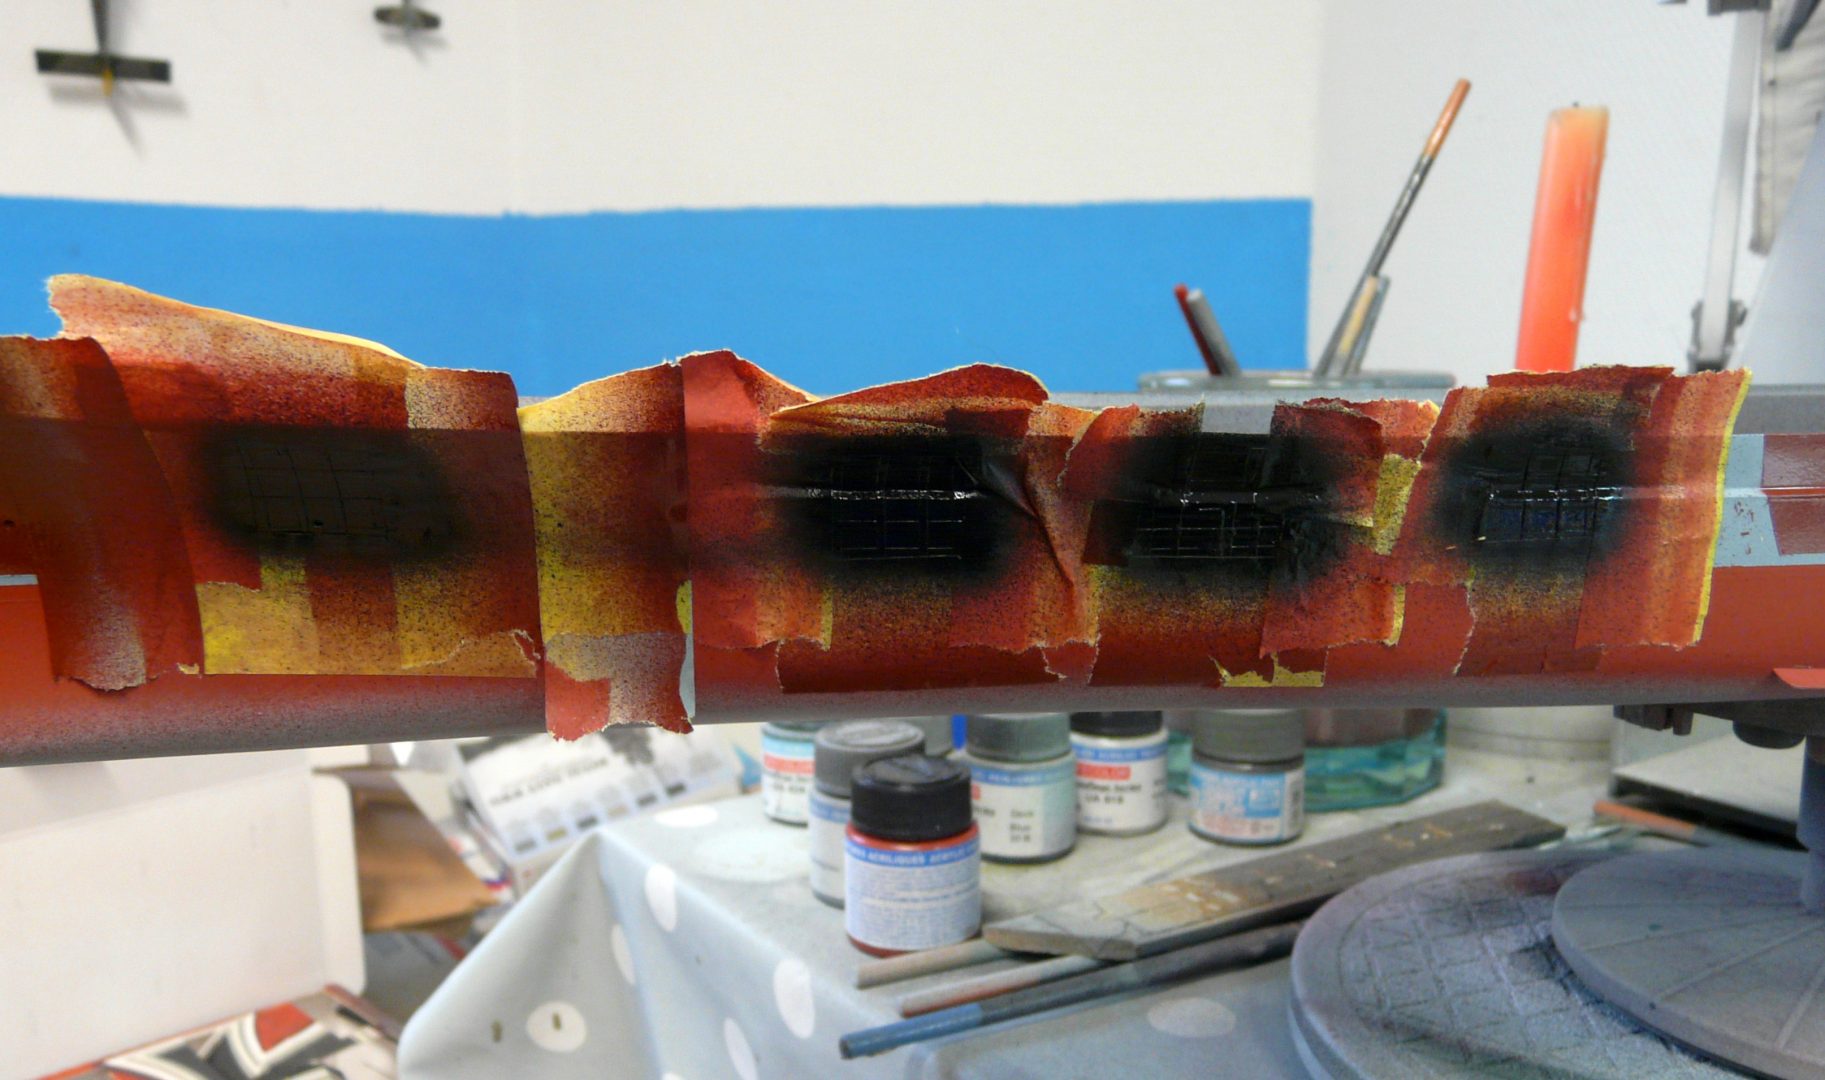
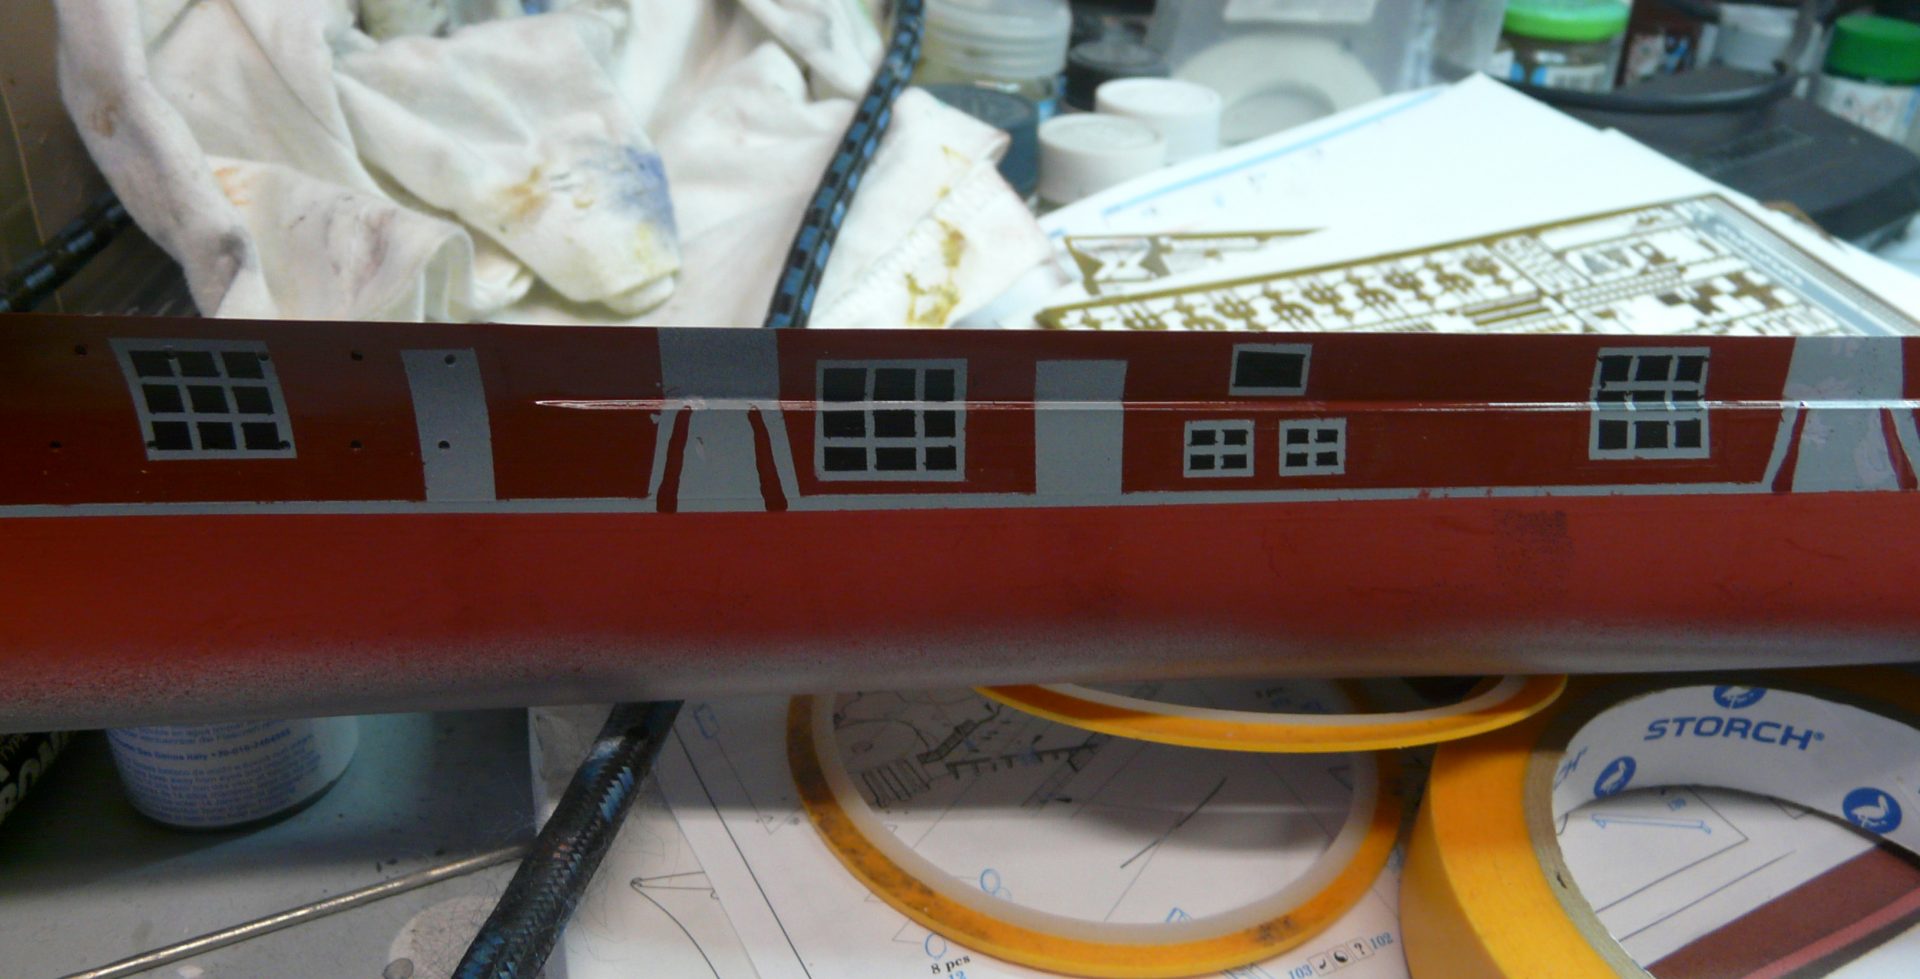
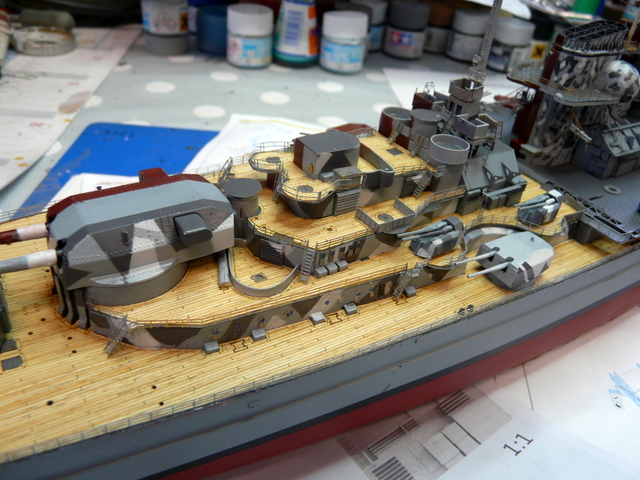
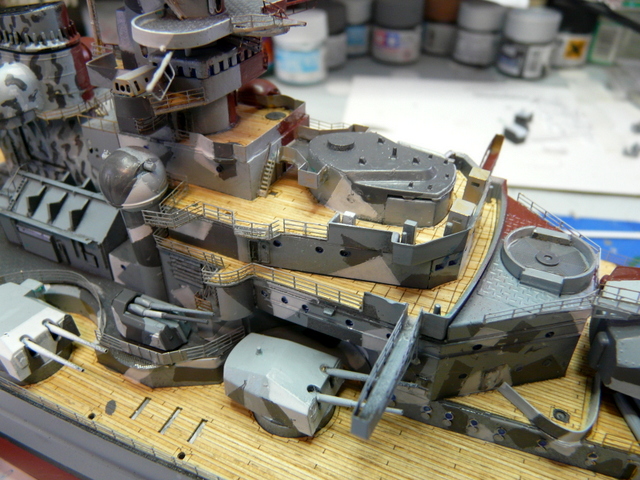
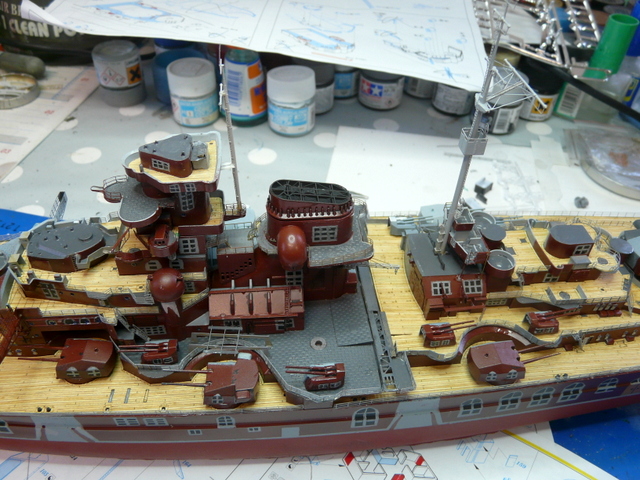
Sur la doc à ma disposition, il n’y a que le côté mer qui est camouflé en «maisons», l’autre côté, quant à lui, a la coque grise et les super structures en camouflage SPLINTER fait de divers losanges avec des tons de gris et blanc.
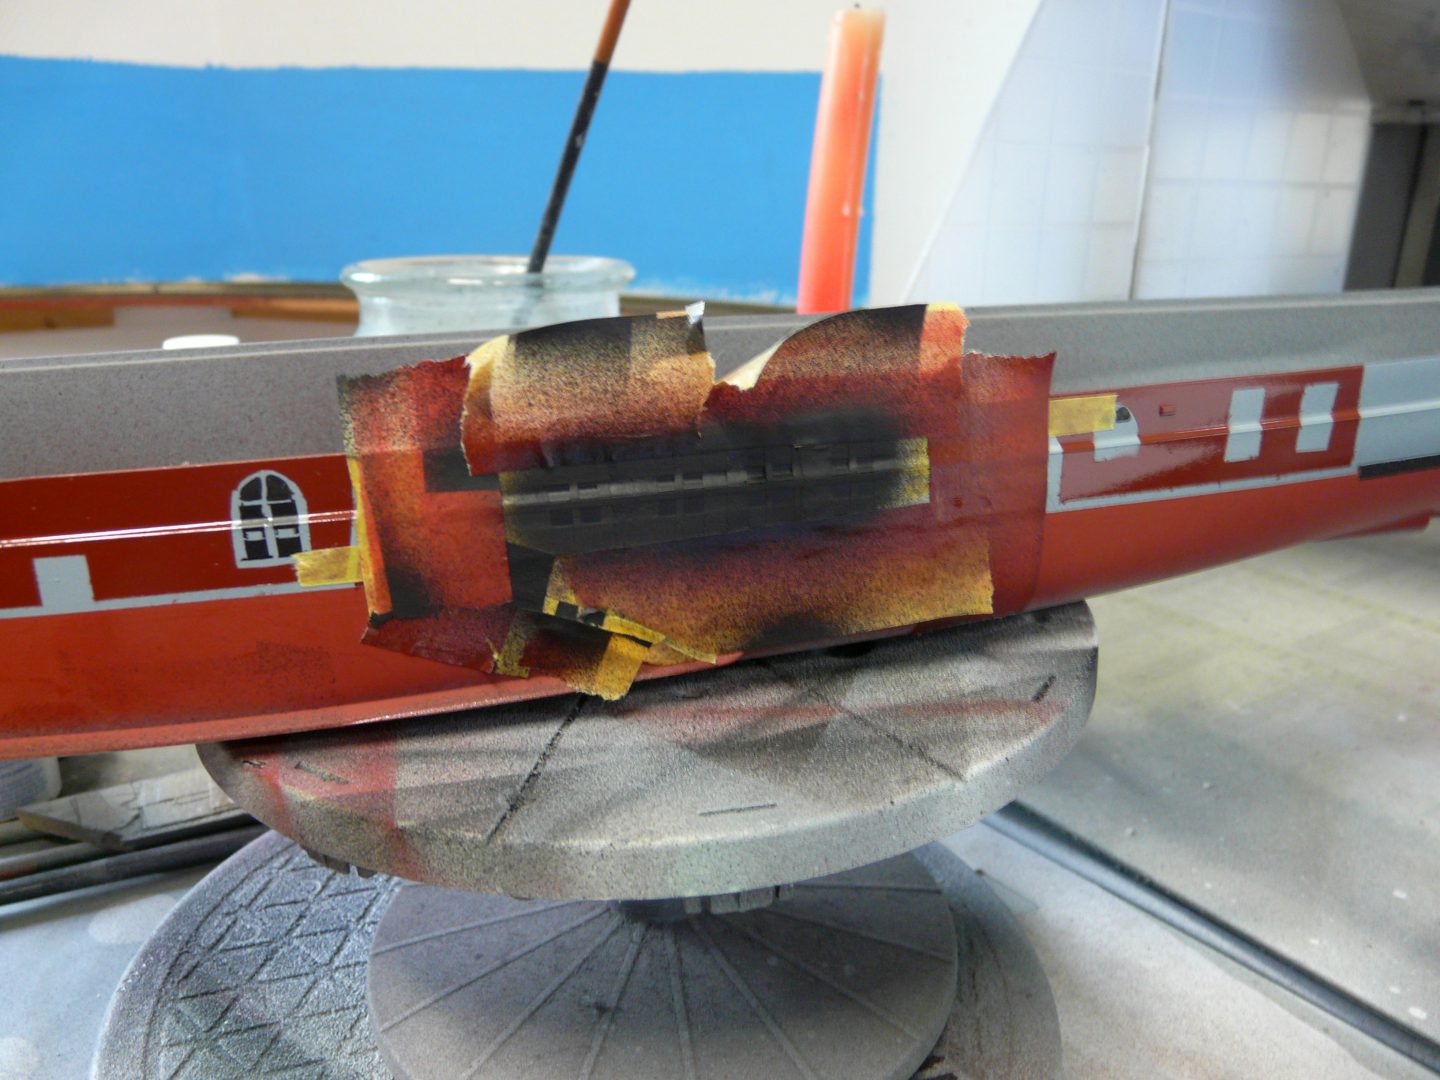
Grâce au plan couleur, j’ai pu placer les fenêtres et les différentes portes. Pour la couleur «maison», j’ai choisi un GUNZE RED BROWN 47. J’ai fabriqué divers caches pour réaliser les fenêtres, cela a été très très long. Le résultat attendu ne saute pas aux yeux et on se demande où l’on va!
On the document at my disposal, there is only the sea side that is camouflaged as « houses », the other side, meanwhile, has the grey hull and the super structures in camouflage SPLINTER made of various lozenges with shades of grey and white.
Thanks to the color plan, I was able to place the windows and the different doors. For the «home» color, I chose a GUNZE RED BROWN 47. I made various covers to make the windows, it was very, very long. The expected result is not obvious and we wonder where we are going!
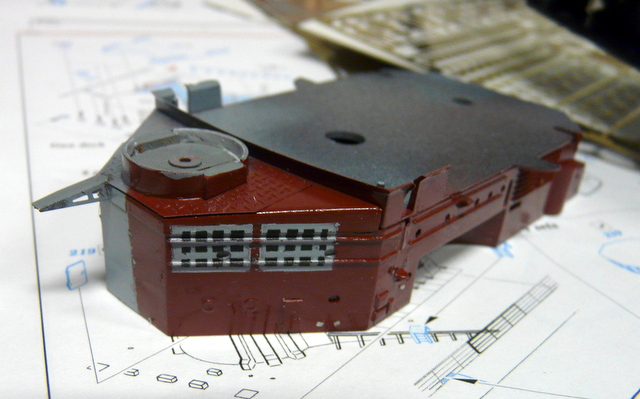
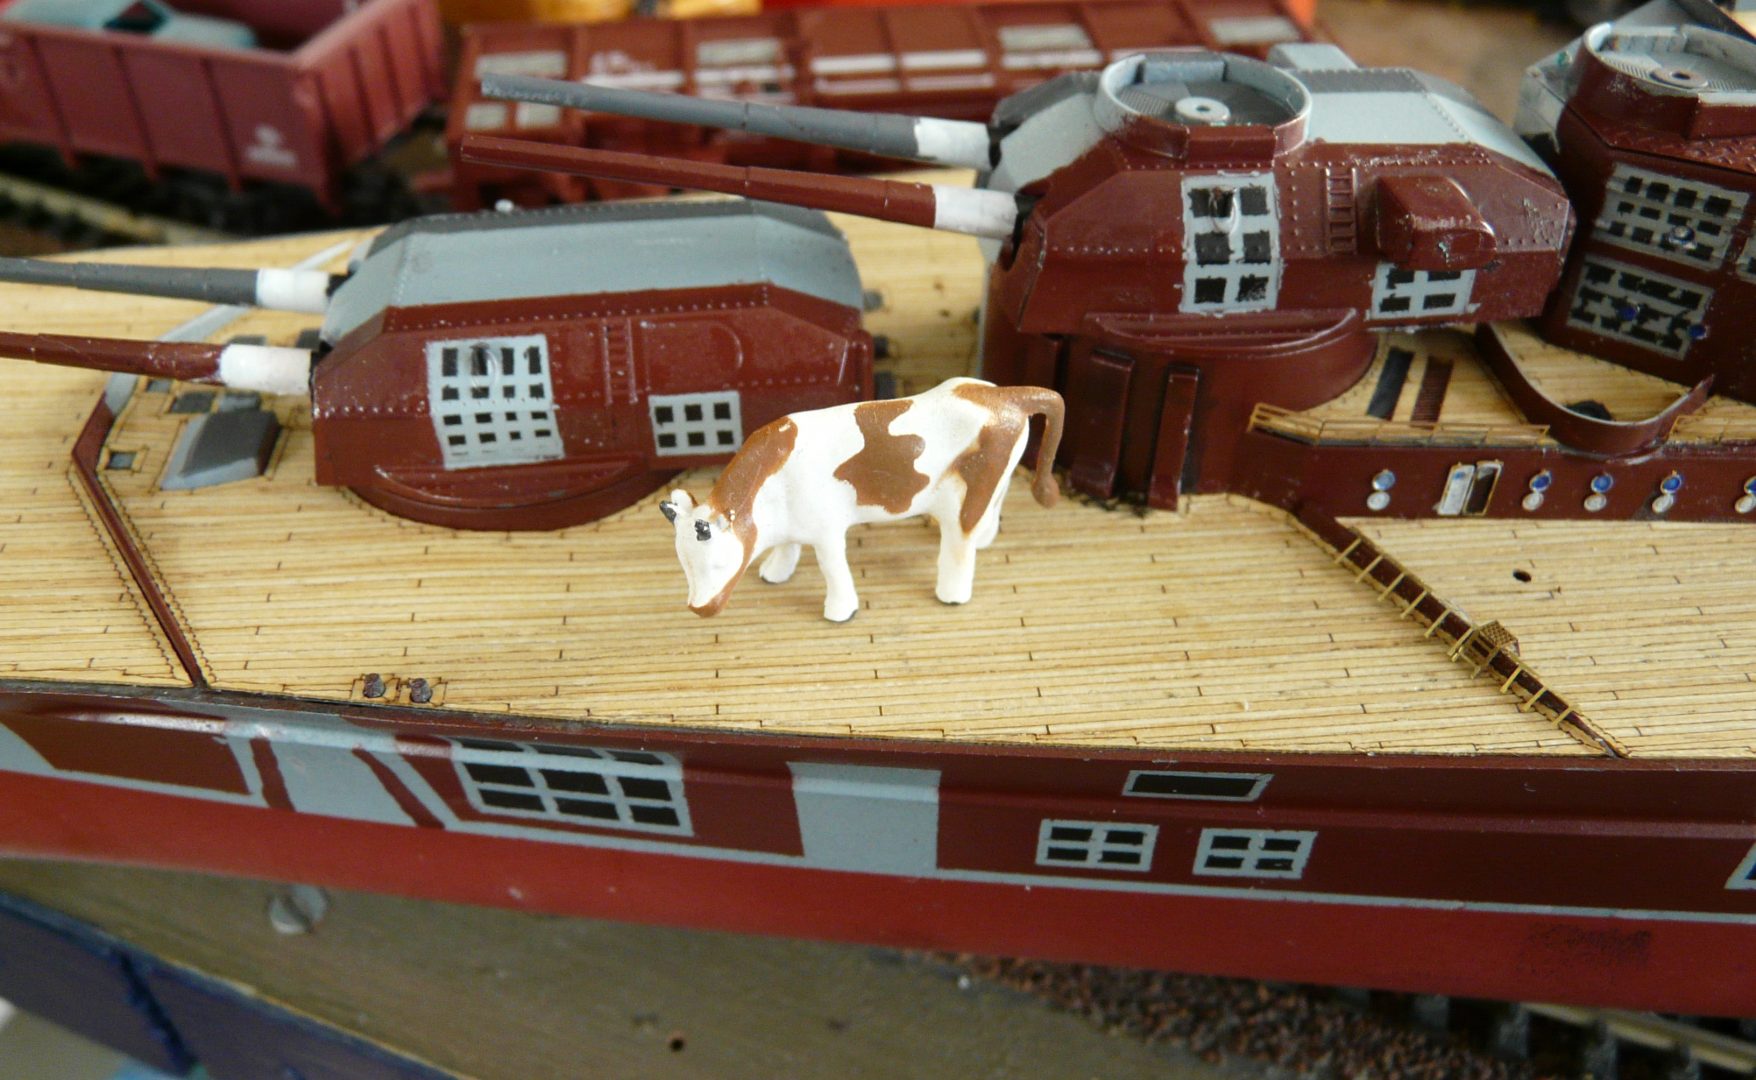


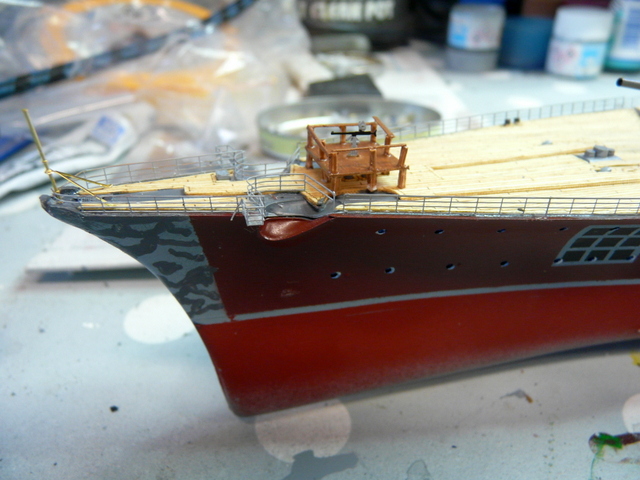
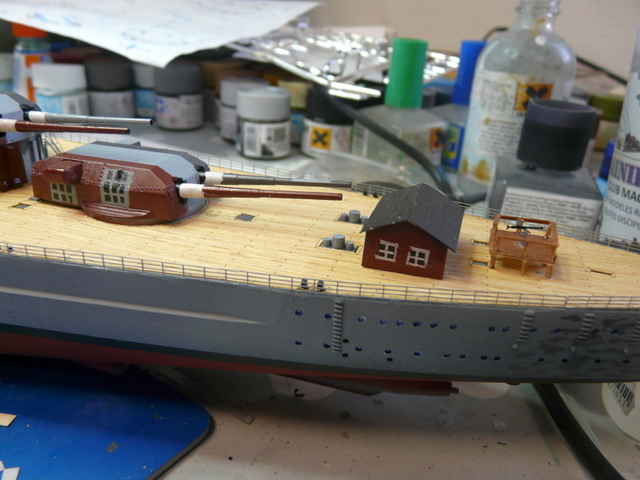
L’avantage du TIRPITZ en construction, c’est qu’il n’y a pas d’armement secondaire, de canot, d’hydravion, de mat arrière et le haut du château n’est pas finalisé. Donc, beaucoup de pièces inutilisées et beaucoup de trous à boucher ou à adapter. A noter, la construction d’un atelier en forme de maison sur la plage arrière et installation de deux mitrailleuses sur des « podiums en bois », une à l’avant, l’autre à l’arrière.
The advantage of the TIRPITZ under construction is that there is no secondary armament, canoe, seaplane, rear mast and the top of the castle is not finalized. So, a lot of unused parts and a lot of holes to plug or adapt. To be noted, the construction of a workshop in the shape of a house on the rear beach and installation of two machine guns on « wooden podiums », one at the front and the other at the rear.
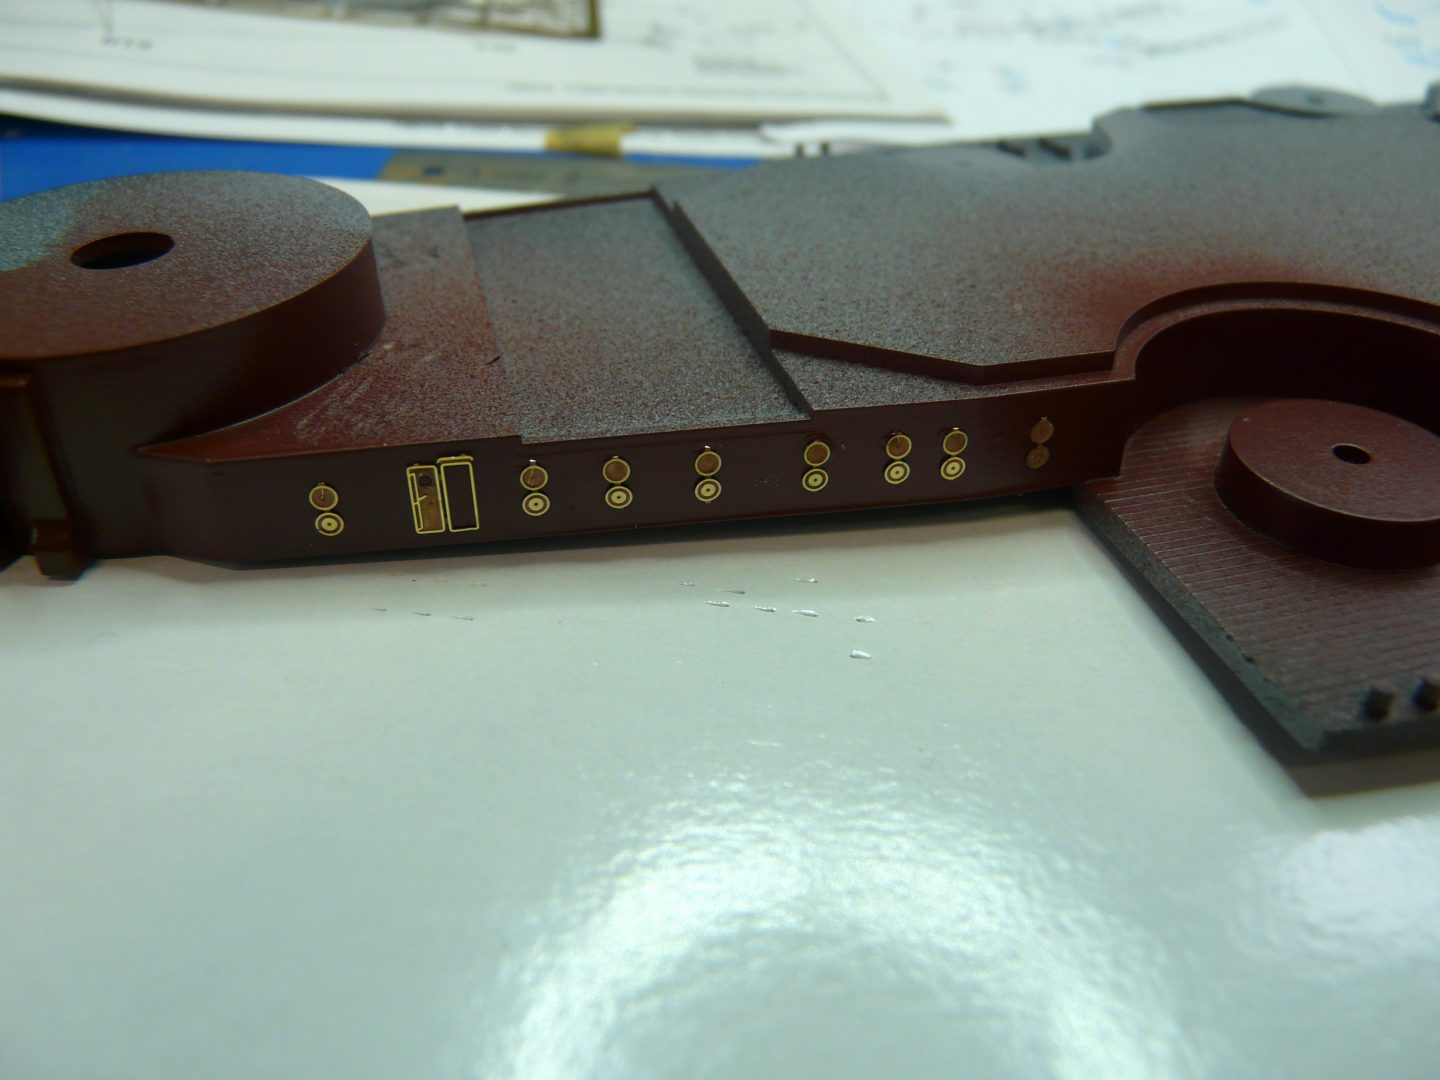
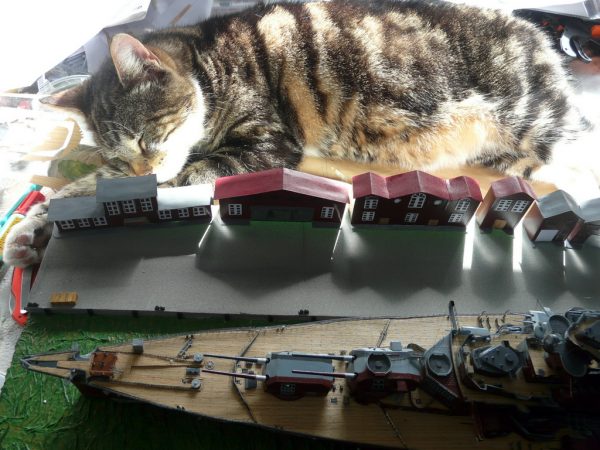
Avec la pose de la photodec, il faut le temps au temps. Il y aura plein de période de «scrongneugneus» et de «fait c..er, partie où cette pièce ?» et de période de gym à quatre pattes par terre avec une lampe ! Heureusement, j’ai pu compter sur le soutien indéfectible de Bibi. Comment, vous ne connaissez pas Bibi, dit « the king of the house » et bien le voilà : ( bon ! là! il est un peu à la ramasse !)
With the installation of the photodec, it takes time to time. There will be plenty of period of «scrongneugneus» and «fact c.. er, part where this room?» and four-legged gym on the floor with a lamp! Fortunately, I was able to count on Bibi’s unwavering support. How, you don’t know Bibi, says «the king of the house» and well here he is: ( good! there! he’s a little picky!)
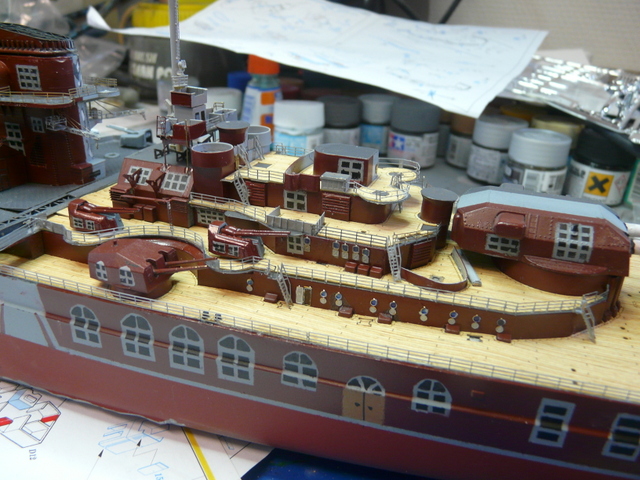
Avec un montage comme celui-là, il y a comme chez tous les maquettistes , des périodes de haut et de bas. Alors, le projet n’en fini plus de durer (au moins, c’est économique).
Enfin, le montage du bateau est finalisé, enfin presque, car il y a toujours quelque chose à rajouter. Pensons maintenant au diorama. J’ai repris la même taille que le dio TIRPITZ précédant. Un fond en contreplaqué 10 mm recouvert de 30 mm de plaque polystyrène. M’inspirant des dios déjà réalisés, il me fallait un quai, une grue, des maisons, des ateliers, des véhicules……………
J’ai fait le quai dans du polystyrène (plaques HEKY pour dio ferroviaire). J’ai réalisé les bites d’amarrage en scratch avec de la fine bande EVERGREN et des chutes de plastiques, le tout peint en noir. J’ai creusé l’emplacement du TIRPITZ et je l’ai mis de côté pour avoir le champ libre pour travailler sur le quai des deux côtés (on redoute toujours le coup de manche malencontreux qui accroche le haut de la mature, cela finit toujours par arriver, surtout en fin de journée).
With a montage like this, there are, as with all models, periods of high and low. So, the project will last forever (at least it’s economical).
Finally, the assembly of the boat is finalized, at least almost, because there is always something to add. Let us now think about the diorama. I took the same size as the TIRPITZ dio before. A 10 mm plywood base covered with 30 mm polystyrene plate. Inspired by dios already made, I needed a dock, a crane, houses, workshops, vehicles……………
I made the platform in polystyrene (HEKY plates for railway dio). I made the Scratch Docking cocks with fine EVERGREN tape and plastic scraps, all painted black. I dug the location of the TIRPITZ and set it aside to have the free field to work on the dock on both sides (we always dread the untoward handle that hangs the top of the mature, it always ends up happening, especially at the end of the day).
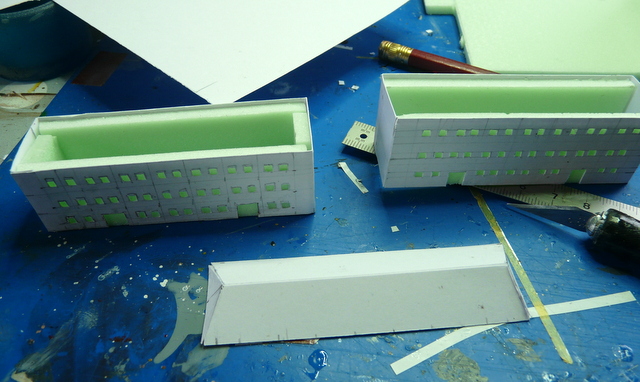
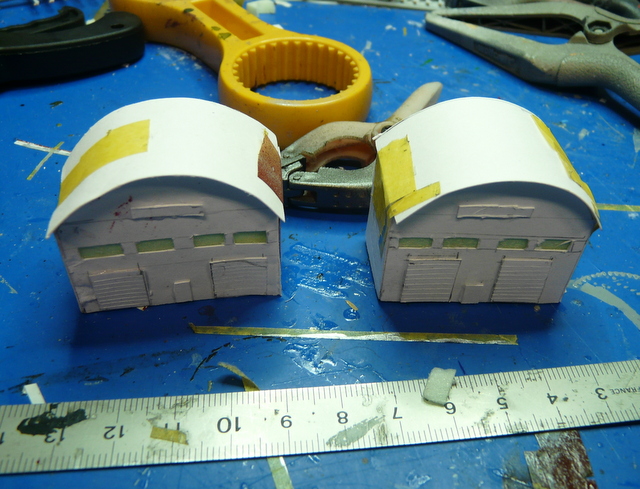
LES MAISONS : Je dois avouer que là, je suis resté longtemps perplexe quant à leur réalisation. Quels matériaux? quelles tailles? Là, il faut vraiment avoir un jour de motivation exceptionnelle (vous connaissez bien cette situation ?). Et l’idée m’est venue accompagnée de la motivation : tracés sur des feuilles de bristol, quelques essais et découpages, comme les petits enfants, renforts en plaques HEKY . Adaptation de l’échelle en mesurant la hauteur et en multipliant par 350 pour rester réaliste le plus possible. Une fois commencé, c’était parti, l’idée était trouvée. J’ai fait une adaptation des vues des dioramas existants. Une fois peintes, agrémentées de fenêtres, ma conjointe et le Bibi m’ont dit que c’était pas mal, mais comment croire des partenaires acquis à votre cause ? Là, encore, cela prend du temps…………….
THE HOUSES: I have to admit that I was puzzled about their realization for a long time. What materials? What sizes? There, you really need to have a day of exceptional motivation (you know this situation well?). And the idea came to me with motivation: traced on bristol sheets, some essays and cutouts, like small children, reinforcements in HEKY plates . Adaptation of the scale by measuring the height and multiplying by 350 to remain as realistic as possible. Once started, it was gone, the idea was found. I made an adaptation of the views of the existing dioramas. Once I painted it, with windows on it, my wife and the Bibi told me it wasn’t bad, but how can I trust partners who are committed to your cause? Here again, it takes time…………….
REPRODUIRE LA MER DU NORD ???? : Encore une grande interrogation. Je ne l’ai jamais vue. Ma seule inspiration ne vient que lorsque je vais à BREST et que je passe sur le grand pont de l’ Elorn, je regarde la couleur de l’eau, changeante suivant la météo et la lumière du jour, tantôt verte, tantôt boueuse.
Après avoir recouvert ma surface de polystyrène «mer» de papier WC blanc et propre (je plaisante !) ; après avoir attendu quelques jours de séchage, je suis parti sur une base de vert de chrome acrylique (je ne frime pas, c’est ce qui est marqué sur le tube), puis j’ai travaillé avec différents verts GUNZE. L’effet ne semble pas probant. Un de mes campistes me dira même que ça ressemble à un champ à vaches (il a fini au coin tout le reste de la séance).
Ce qu’il faut se convaincre, c’est que l’on fait de la maquette pour soi-même. C’est votre vision des choses et vous ne pourrez jamais faire l’unanimité auprès des collègues maquettistes, alors ma mer restera comme cela. Un léger drybrusch de blanc sur la crêtes des vagues et des couches de vernis brillant.
REPLICATING THE NORTH SEA????: Another big question. I’ve never seen it. My only inspiration comes when I go to BREST and I pass on the big bridge of the Elorn, I look at the color of the water, changing according to the weather and the daylight, sometimes green, sometimes muddy.
After having covered my surface with «sea» polystyrene with white and clean toilet paper (I’m kidding!); after waiting a few days of drying, I left on a base of acrylic chrome green (I don’t show off, that’s what is marked on the tube), then I worked with different GUNZE greens. The effect does not seem convincing. One of my campers will even tell me that it looks like a cow field (he finished at the corner all the rest of the session).
What you have to convince yourself is that you’re making a model for yourself. This is your vision of things and you will never be able to make unanimity among fellow designers, so my sea will remain like that. A light white drybrusch on the crests of the waves and layers of glossy varnish.
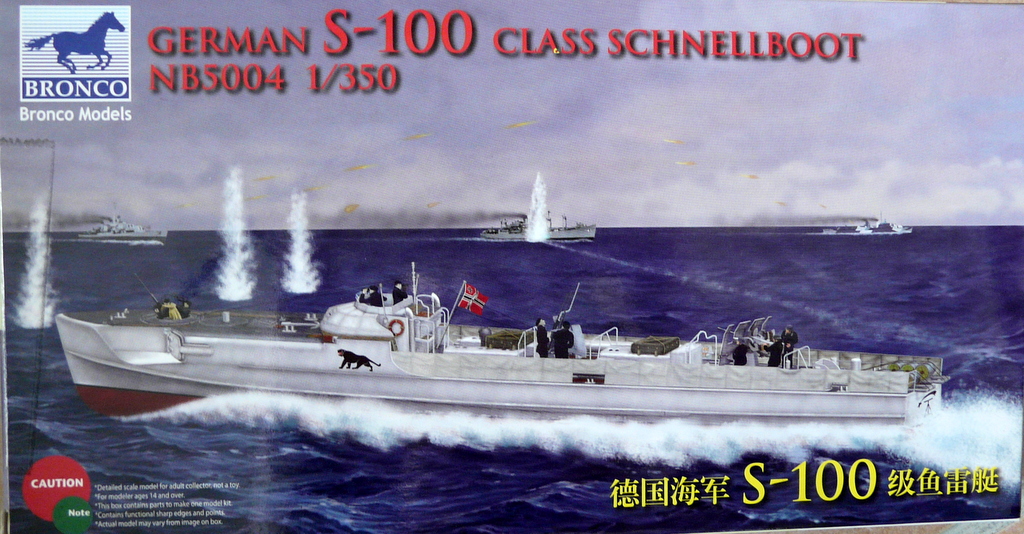
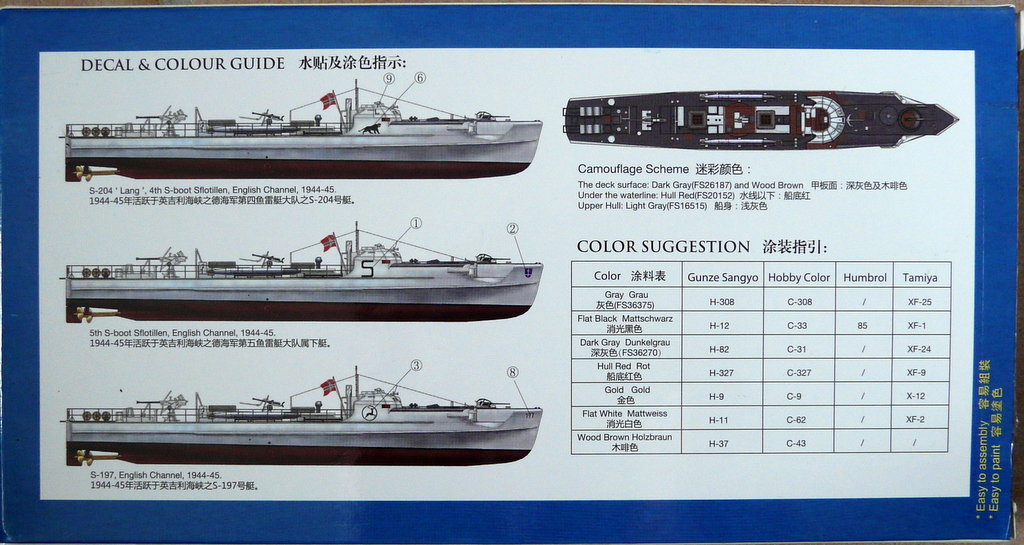
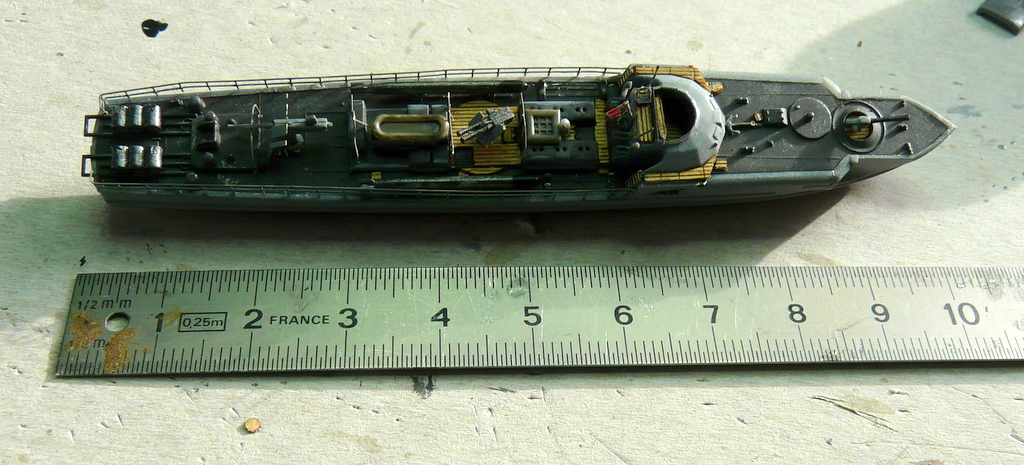
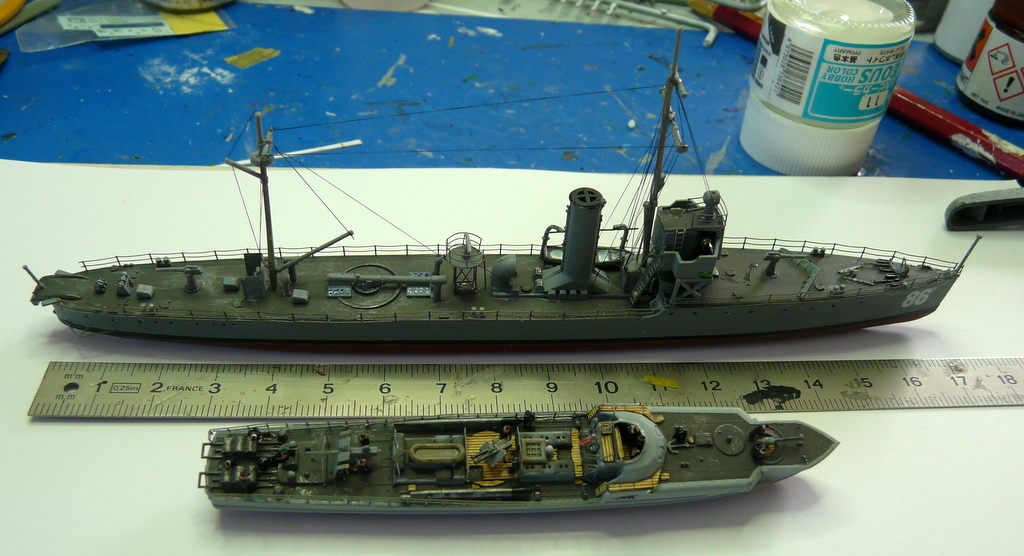
LA VEDETTE LANCE TORPILLE : J’avais dans mon stock, la vedette lance-torpilles au 350 de chez BRONCO MODEL. J’ai re-découvert ce kit, très peu de pièces (ça m’arrange !), une petite planche de photodec, de décalques et un très beau plan sur papier glacé. La déco est sur le revers de la boîte.
THE TORPEDO LAUNCH: I had in my stock the torpedo launch at 350 from BRONCO MODEL. I re-discovered this kit, very few pieces (it suits me!), a small plate of photodec, decals and a very nice plan on glossy paper. The decoration is on the reverse of the box.
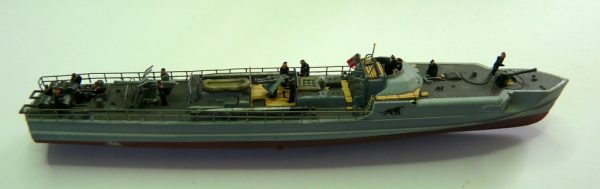
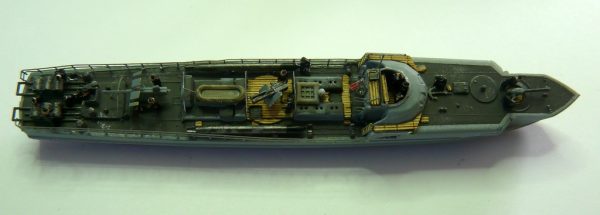
Le montage ne pose aucun problème, pas un gramme de mastic utilisé. Mise en peinture facile, ah ! J’avais aussi dans le stock, les petits pont en bois pour ce modèle (ARTWOX MODEL 10104). C’est très fin, très réaliste, un grand et gros plaisir…….pour 9 cm de long……………………..Il me fallait encore autre chose, de petite taille pour ne pas voler la première place au TIRPITZ. Dans mon stock, je redécouvrais le :
Mounting is no problem, not a gram of putty used. Easy painting, ah! I also had in stock the small wooden bridges for this model (ARTWOX MODEL 10104). It is very thin, very realistic, a great and big pleasure……. for 9 cm long…………………….. I still needed something small to avoid stealing the first place at TIRPITZ. In my stock, I rediscovered the:

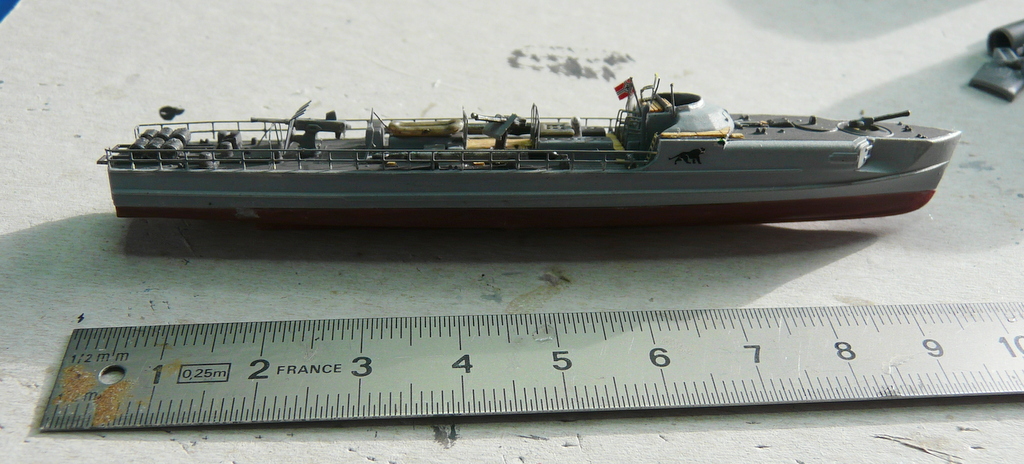
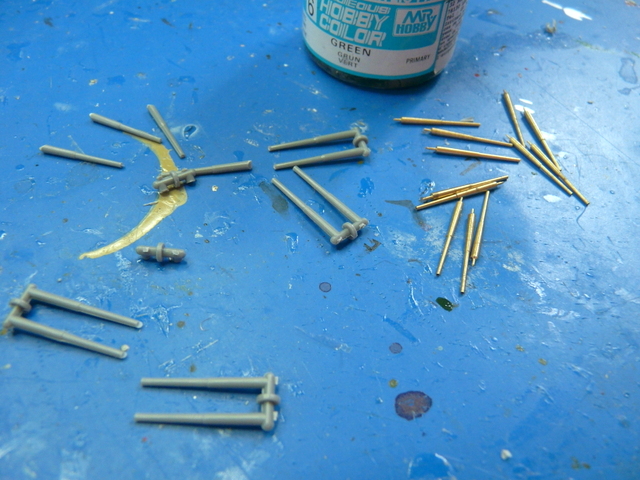
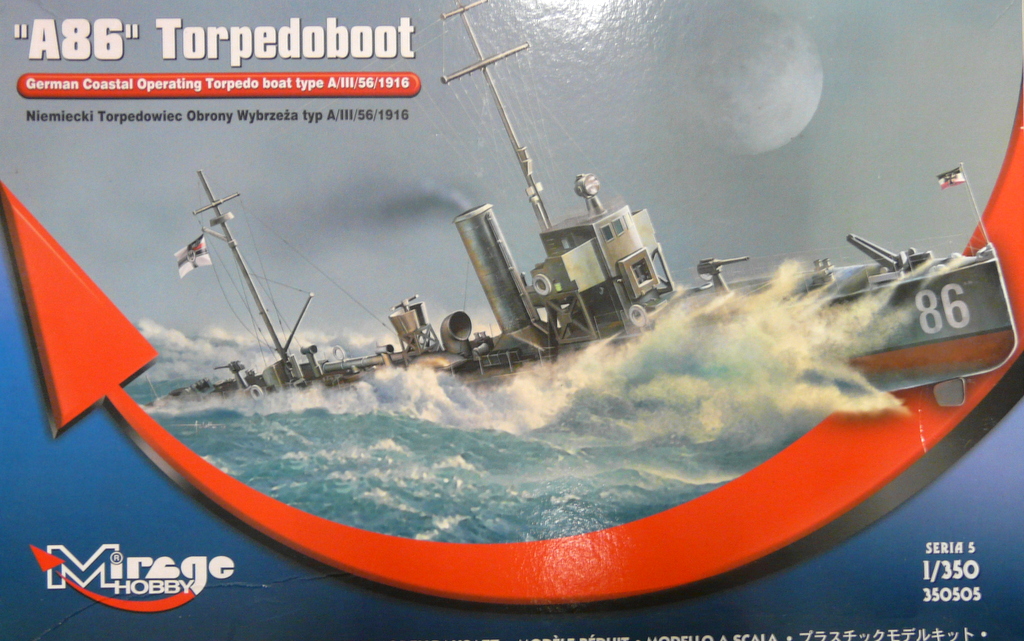
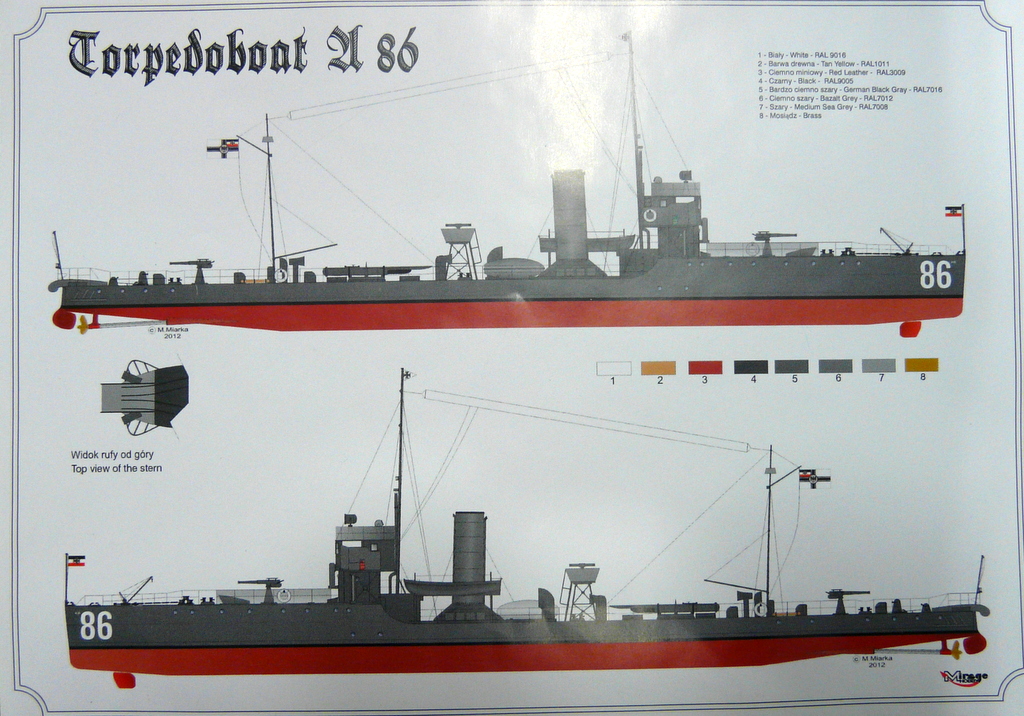
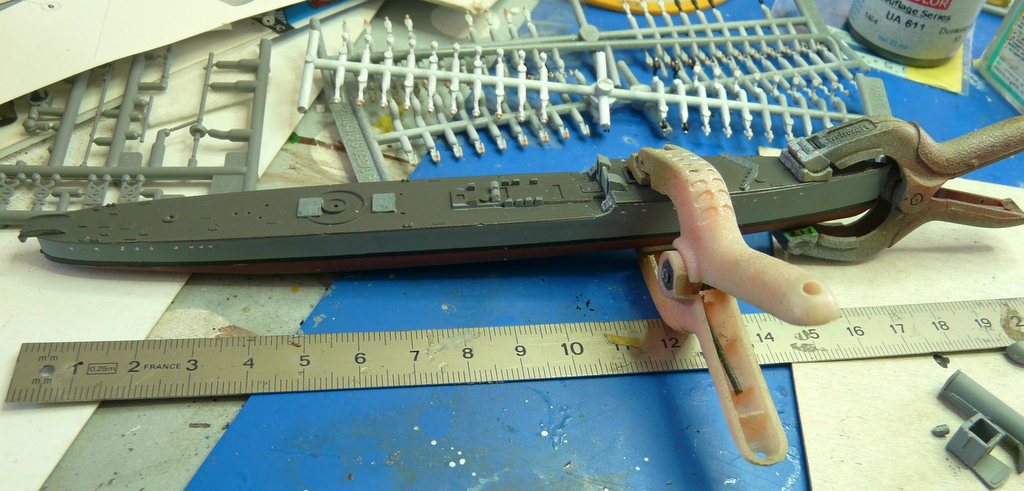
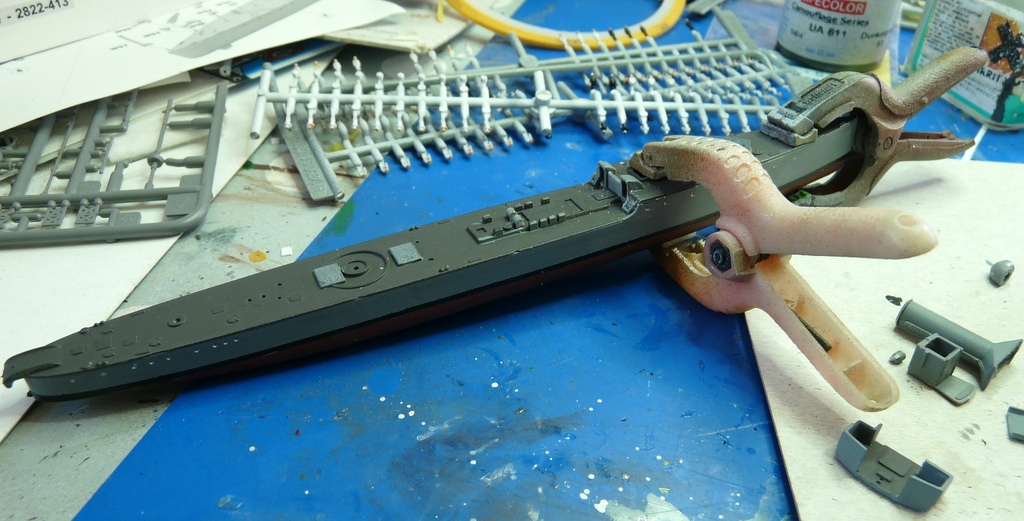
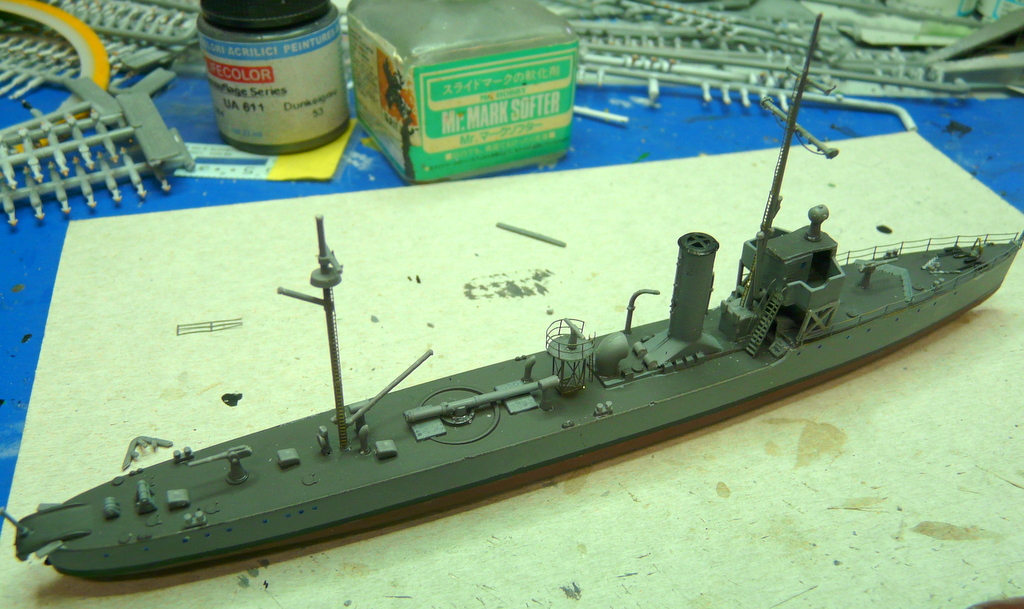
TORPEDO BOOT : un vieux kit MIRAGE au 350. Là, pas de photodec. Une bonne centaine de mini-pièces à assembler en plastique bien épais. Cela change du TAMIYA et sans la photodec, ça craint….. A noter que dans le temps, il existait un très beau kit de photodec pour ce modèle, introuvable maintenant…. Le montage avec ces minis pièces reste très délicat. La mise en peinture ne pose pas de problème. Ah zut ! J’ai oublié de vous dire que c’était un bateau de la guerre 14/18. Mais dans mon dio, il sera le survivant, une petite impasse à l’histoire. Quoique ? Quand on travaille avec de la photodec depuis de longues années, on a tous la boîte à rabiot, ce qui m’a permis de changer des pièces en plastique épais par des pièces métal beaucoup plus fines, du coup ça change beaucoup le modèle qui a une meilleure allure.
TORPEDO BOOT: an old MIRAGE kit at 350. There, no photodec. A good hundred mini pieces to assemble in thick plastic. This changes TAMIYA and without the photodec, it sucks….. Note that in the past, there was a very nice photodec kit for this model, not found now…. The assembly with these mini parts remains very delicate. The painting does not pose a problem. Oh jeez! I forgot to tell you that it was a 14/18 ship. But in my dio, it will be the survivor, a little stalemate to history. What? When we work with photodec for many years, we all have the rabiot box, which allowed me to change thick plastic parts by much finer metal parts, so it changes a lot the model that has a better look.
Photos, topo et montage: Alpers
La suite et fin samedi prochain
The sequel and end next Saturday